При развертывании Windows на компьютер с несколькими жесткими дисками убедитесь в том, что образы применяются к соответствующим дискам. Диски можно определить в средстве diskpart с помощью пути расположения (например, PCIROOT(0)#PCI(0100)#ATA(C00T00L00)), который зависит от физического подключения к компьютеру.
Для компьютеров на основе BIOS или компьютера со службой виртуальных дисков (VDS) для выбора соответствующих дисков можно использовать команды SELECT DISK=SYSTEM and SELECT DISK=NEXT. Дополнительные сведения см. в разделе Управление несколькими жесткими дисками на основе BIOS.
В этом разделе
Выбор системного диска
Примечание.
При настройке систем с несколькими дисками не используйте команду SELECT DISK=0 для указания системного диска. При перезагрузке компьютер может назначить дискам другие номера, а различные компьютеры с одной конфигурацией дисков также могут иметь различные номера дисков.
Определение пути расположения диска
Чтобы отобразить путь расположения для выбранного диска, используйте команду diskpart DETAIL DISK.
В этом примере путь расположения для выбранного диска равен PCIROOT(0)#PCI(0100)#ATA(C00T00L00).
Чтобы выбрать диск, используйте команду diskpart SELECT DISK= , где представляет собой путь расположения диска:
Формат пути расположения
Для дисков с типом шины SCSI/SAS/RAID следует использовать следующий формат пути расположения:
Для дисков с типом шины ATA/SATA следует использовать следующий формат пути расположения:
В следующей таблице определяются элементы пути расположения.
Получите путь, вызвав SetupDiGetDeviceProperty с помощью свойства DEVPKEY_Device_LocationPaths.
Один из следующих типов: ATA, SCSI, SAS или RAID.
Поле PathId для SCSI_ADDRESS. Получите идентификатор PathID путем вызова IOCTL_SCSI_GET_ADDRESS.
Поле PathId для SCSI_ADDRESS. Получите идентификатор PathID путем вызова IOCTL_SCSI_GET_ADDRESS.
Примечание.
Для дисков с типом шины ATA/SATA идентификатор канала относится к тому же полю, что и PathID. Используется префикс C.
Поле TargetId для SCSI_ADDRESS. Получение путем вызова IOCTL_SCSI_GET_ADDRESS.
Поле Lun для SCSI_ADDRESS. Получение путем вызова IOCTL_SCSI_GET_ADDRESS.
В следующей таблице приведены примеры путей расположения для всех типов шин и дисков:
Источник
Как загрузить ibm’овское лезвие в UEFI Shell?
Доброго времени суток
Сабж. Есть hx5 ( 7872 ) с Qlogic’овским FС. Нужно обновить qlogic EFI driver. Для этого нужно загрузиться в UEFI Shell. Но где его взять — непонятно
А стандартно через F1 при старте
не получается что ли?
Некоторые производители не предоставляют EFI Shell сами. Бери отсюда
В том uefi, что установлен сейчас, нет uefi shell. vostrik уже посдказал, что можно взять full uefi у qlogic’а, но я пока не могу заставить hx5 с него загрузиться :\
через dd создал 128 мб файл, в нём партицию fat32, в неё распаковал full uefi от qlogic’a. Монтировал через remote drive корзины. В «/Boot Manager/Boot From File» ничего нового не появилось
Спасибо, попробую. Случайно не знаешь, как его готовить к загрузке?
Ложишь его в ESP или там в корень флешки какой-нибудь с FAT32 и впринципе должно работать. У меня в UEFI есть специально Launch efi shell from filesystem device.
Вот тут проблема. Корзина в другом конце города, есть только удалённая консоль корзины с возможностью монтирования. Образы cd точно принимает, насчёт образа флешки не уверен
У меня работало норм с флехи проброшенной через amm. У тебя какая корзина?
Чисто случайно под рукой не было не флэшки, ни компа с виндой
А теперь правильный ответ:
Главное шаманство — загрузить файл в AMM, а не просто примонтировать к лезвию, и расширение должно быть .uki. Остальное может и не принципиально, но зато это уже проверенный рецепт
подготовить образ флешки. расширение «.uki» — это важно. и фиг догадаешься
таблица разделов mbr ( msdos )
выравнивание разделов по границе 1MиБ ( возможно не требуется )
тип раздела — «0b» ( «W95 FAT32» )
В результате в меню должен появиться пункт вроде
uefi shell взял у qlogic ( qoogle: Full UEFI Shell for QLogic ). vostrik , ещё раз спасибо
Другой вариант uefi shell. Не проверял.
Подробно про UEFI, см. секцию «References and Additional Information»
Источник
Настройка нескольких жестких дисков
при развертывании Windows на компьютере с несколькими жесткими дисками можно убедиться, что образ применяется к конкретному жесткому диску, используя идентификаторы оборудования, например путь расположения или значение аппаратного прерывания.
Путь к расположению — это строка, указывающая физическое расположение, к которому подключен каждый диск, например: PCIROOT(0)#PCI(0100)#ATA(C00T00L00) . При производстве компьютера используйте устойчивое физическое расположение при подключении дисков, а затем используйте строку пути расположения для определения каждого жесткого диска.
Для компьютеров на основе BIOS или компьютера, на котором запущена служба виртуальных дисков (VDS), можно использовать команды выбрать диск = система и выбрать диск = далее , чтобы выбрать соответствующий жесткий диск.
Определение пути к расположению диска
Используйте команды DiskPart: list disk и select disk (пример: select disk 1 ) для перехода между дисками на компьютере.
Чтобы отобразить путь к расположению выбранного диска, используйте команду DiskPart detail disk .
В следующем примере путь к расположению выбранного диска — ПЦИРУТ (0) #PCI (0100) #ATA (C00T00L00).
Выбор дисков
Выбор системного диска
Компьютеры на основе BIOS. для выбора системного диска по умолчанию используйте команду Выбор диска = система .
Эта команда выбирает диск с параметром прерывания 13h, имеющим значение 80h. Если значение 80h назначено устройству флэш-памяти USB, эта команда выбирает жесткий диск со значением 81h.
Компьютеры на основе UEFI. чтобы выбрать диск, используйте команду diskpart Выбор диска = путь к расположению.
Не используйте SELECT DISK=SYSTEM команду или API жетсистемдискнтпас на компьютерах на базе единый интерфейс EFI (UEFI) для выбора системного диска. SELECT DISK=SYSTEM Команда и API жетсистемдискнтпас указывают диск, с которого операционная система загрузилась с системного диска. при загрузке из среды Windows PEэта команда выбирает диск PE Windows в качестве системного диска. При загрузке из системы с несколькими дисками, включающими системный раздел EFI (ESP), эта команда может выбрать неправильный диск.
Выбор несистемного диска
Выберите диск по пути расположения. Чтобы выбрать диск, используйте команду DiskPart SELECT DISK= , где — путь к расположению диска. Эта команда позволяет указать диск по расположению.
Выберите диск, используя «следующий» диск. Используйте команду DiskPart SELECT DISK=NEXT . Эта команда позволяет указать все оставшиеся жесткие диски независимо от расположения. Чтобы выбрать больше дисков, повторите SELECT DISK=NEXT команду, чтобы выбрать каждый диск по порядку. Если больше нет дисков для выбора, программа DiskPart возвращает ошибку.
Компьютер поддерживает контекст для SELECT DISK=NEXT команды при условии, что DiskPart продолжит выполнение. Если Программа DISKPART завершает работу, компьютер теряет этот контекст.
Пример (два диска UEFI/GPT):
Определение системного диска после перезагрузки
После перезагрузки буква диска может измениться. приведенный ниже пример сценария можно использовать для выбора системного диска и повторного назначения букв разделам ESP, recovery и Windows.
Форматирование несистемных дисков
Этот пример сценария выбирает системный диск, а затем пропускает его, не изменяя содержимое диска. Затем сценарий выбирает два несистемных диска и создает на каждом диске один форматированный пустой раздел. Секции не получают изображение, поэтому нет необходимости их специально указывать.
Источник
Sysprep / cto panic
07-29-2017 01:10 PM
Mark as New
Bookmark
Subscribe
Permalink
Print
Email to a Friend
Flag Post
So I needed to do a factory reset now all I get is the following:- Restoration incomplete I click the retry button same thing happens. If I click details I get the following:- Sysprep not launched properly. The process will cause CTO panic because the image might not be normal.
Can anyone help please first time on the forum sorry if this is a repeat post.
Thanks in advance.
07-30-2017 10:19 AM — edited 07-30-2017 01:00 PM
Mark as New
Bookmark
Subscribe
Permalink
Print
Email to a Friend
Flag Post
How did you create the bootable drive?
Using the Media creation Tool should have set the drive up completely without this issue.
I would try booting with Legacy Mode enabled/Secure Boot off.
F10 to boot into Bios at startup.
Arrow over to System Configuration.
Arrow down to Boot Options and disable Secure Boot and enable Legacy (if is showing).
F10 to Save and Exit.
You will be prompted to enter a code. Do this, then reboot and try to boot into the USB again.
IF that does not work,
I would recommend you either try a different drive or try cleaning this drive and create the bootable again.
07-29-2017 02:42 PM
Mark as New
Bookmark
Subscribe
Permalink
Print
Email to a Friend
Flag Post
What is the full model number of your PC please?
Also, How are you performing the recovery and what is the full error message ? Does it include «FAILED DEVICE #0: Description : USB-IF xHCI USB Host Controller»?
07-30-2017 01:23 AM
Mark as New
Bookmark
Subscribe
Permalink
Print
Email to a Friend
Flag Post
Hi, Notebook model HO Pavilion 15 Notebook PC Product number F5c05ea#abu Serial number 5cd4103zvz
Performing recovery without disc as this is all pre installed.
The full error message is detailed in the original post does not include failed device.
I do have pictures of the error screen not sure how you attach them to this post.
07-30-2017 01:43 AM
Mark as New
Bookmark
Subscribe
Permalink
Print
Email to a Friend
Flag Post
For your own security, remove the Serial number in your post above.
That model came with Windows 8.1 originally and you upgraded to 10?
You are trying to do a recovery from the partition I assume.
Reinstall Windows 10 via the USB method using the Microsoft Media Creation Tool .
When you install to the laptop, use Custom and delete the partitions first. Let Windows create new partitions itself when it installs.
IF it works, install the drivers for Win 10 from this page.
Let me know what happens or if you need more instructions.
07-30-2017 04:32 AM
Mark as New
Bookmark
Subscribe
Permalink
Print
Email to a Friend
Flag Post
07-30-2017 07:03 AM
Mark as New
Bookmark
Subscribe
Permalink
Print
Email to a Friend
Flag Post
I have downloaded the file to a usb stick plugged it into my laptop and nothing happens could you give me some more instructions please.
07-30-2017 08:44 AM
Mark as New
Bookmark
Subscribe
Permalink
Print
Email to a Friend
Flag Post
Use the Media Creation Tool to burn the bootable ISO file to an ( 8 to 32 GB ) usb flash stick on another computer that is working.
Then on your laptop with the AC adapter plugged in, insert the USB drive and rapidly tap the the Esc key on power up, to bring up the Startup Menu .
Choose F9 for the Boot Device Options .
Use the arrow keys to select the USB drive and hit the Enter key.
Follow the prompts. It will ask you to select your lanquage, etc.
When you get to the part to choose to let Windows install automatically or use Custom, choose Custom.
Delete the existing partitions, then continue to install Windows.
Источник
# Userspace Issues
Issues regarding once you’ve booted the installer and the GUI has loaded.
# macOS installer in Russian
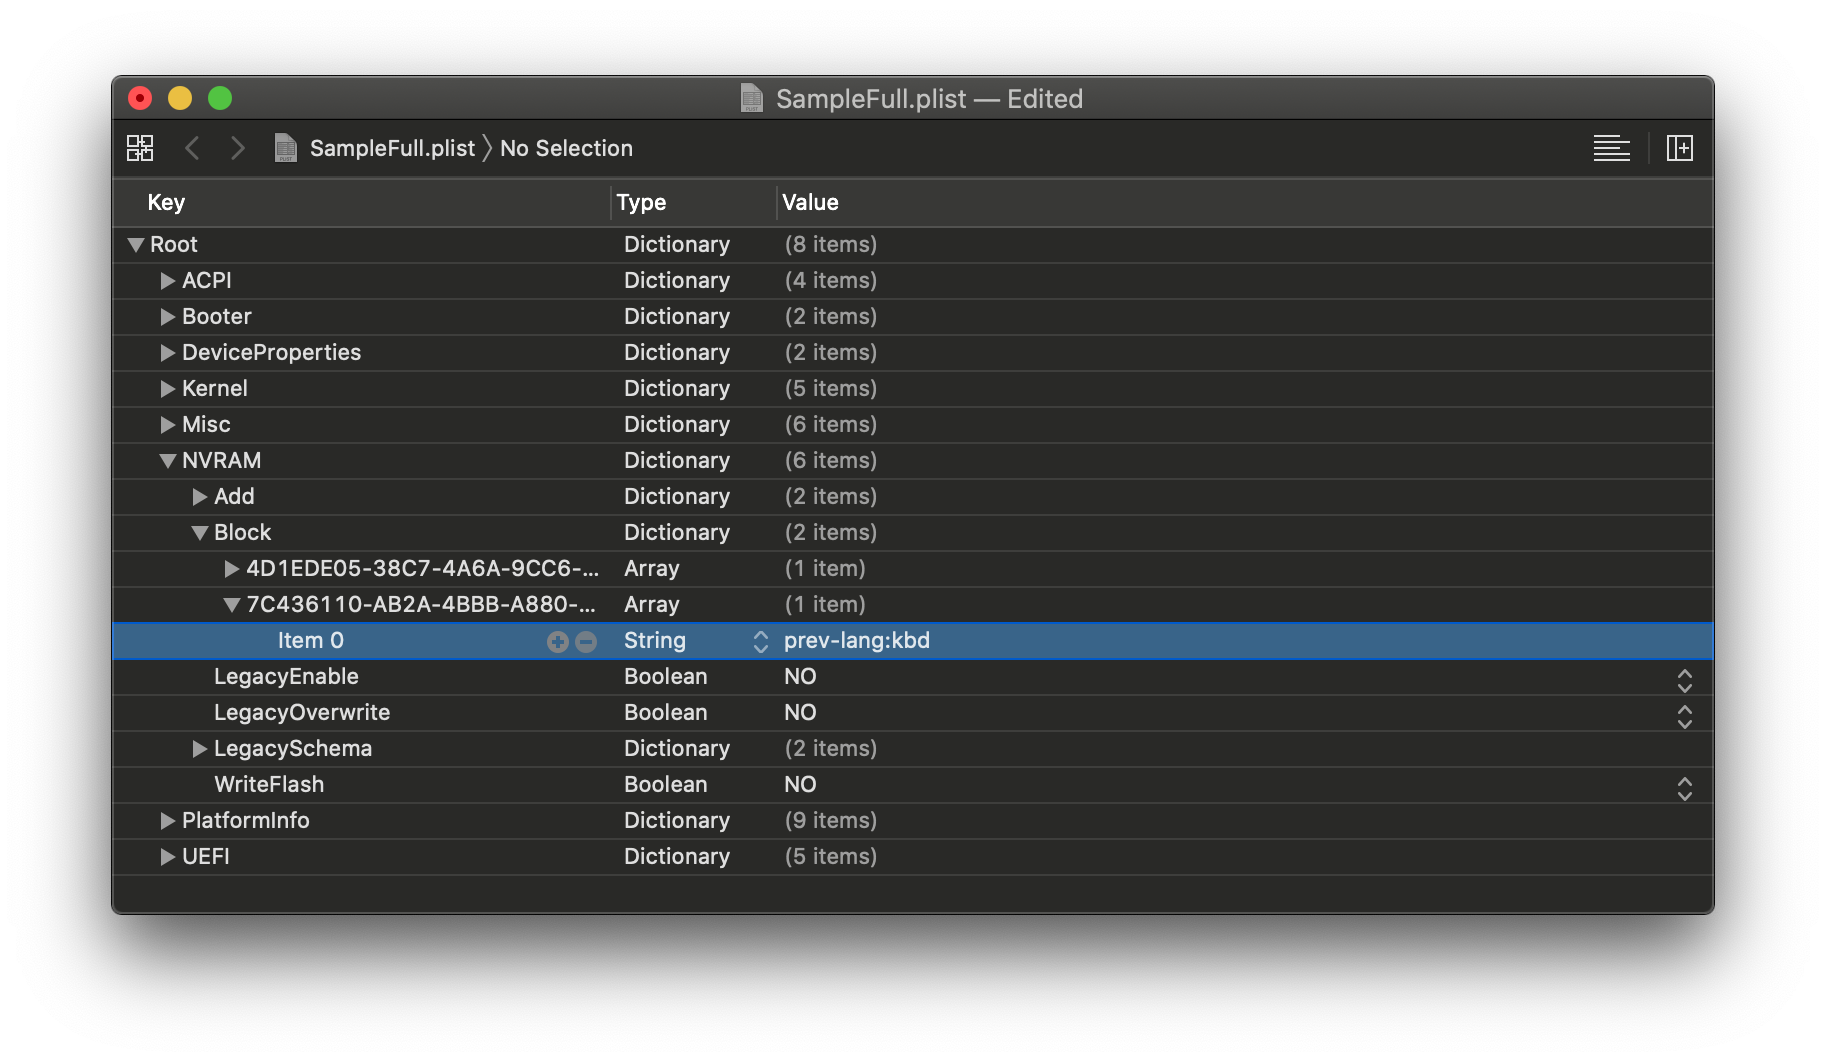
Default sample config is in Russian because slavs rule the Hackintosh world, check your prev-lang:kbd value under NVRAM -> Add -> 7C436110-AB2A-4BBB-A880-FE41995C9F82 . Set to 656e2d55533a30 for American: en-US:0 and a full list can be found in AppleKeyboardLayouts.txt
(opens new window) . For those using with a simple text editor(ie. UEFI Shell, Notepad++, etc), 656e2d55533a30 will become ZW4tVVM6MA==
You may also need to reset NVRAM in the boot picker as well
Note: Thinkpad laptops are known to be semi-bricked after an NVRAM reset in OpenCore, we recommend resetting NVRAM by updating the BIOS on these machines.
Still didn’t work? Well time for the big guns. We’ll force remove that exact property and let OpenCore rebuild it:
NVRAM -> Delete -> 7C436110-AB2A-4BBB-A880-FE41995C9F82 -> Item 0 then set it Type String and Value prev-lang:kbd
# macOS Installer being damaged
If you’ve download macOS before October 2019, you likely have an expired macOS Installer certificate, there’s 2 ways to fix this:
Download newest copy of macOS
Change date in terminal to when the certificate was valid
Disconnect all networking devices(Ethernet, disable WiFi)
In the recovery terminal set to September 1st, 2019:
# Stuck on or near IOConsoleUsers: gIOScreenLock. / gIOLockState (3.
This is right before the GPU is properly initialized, verify the following:
GPU is UEFI capable(GTX 7XX/2013+)
CSM is off in the BIOS
Forcing PCIe 3.0 link speed
Double check that ig-platform-id and device-id are valid if running an iGPU.
Desktop UHD 630’s may need to use 00009B3E instead
Trying various WhateverGreen Fixes
(opens new window)
-igfxmlr boot argument. This can also manifest as a «Divide by Zero» error.
Coffee Lake iGPU users may also need igfxonln=1 in 10.15.4 and newer
# Scrambled Screen on laptops
Enable CSM in your UEFI settings. This may appear as «Boot legacy ROMs» or other legacy setting.
# Black screen after IOConsoleUsers: gIOScreenLock. on laptops and AIOs
Verify the following:
SSDT-PNLF is installed(ie. EFI/OC/ACPI as well as config.plist -> ACPI -> Add)
iGPU properties were setup correctly under DeviceProperties -> Add -> PciRoot(0x0)/Pci(0x2,0x0)
Coffee Lake and newer laptops, add -igfxblr to your boot-args
Alternatively, add enable-backlight-registers-fix | Data | 01000000 to PciRoot(0x0)/Pci(0x2,0x0)
# Black screen after IOConsoleUsers: gIOScreenLock. on Navi
Add agdpmod=pikera to boot args
Switch between different display outputs
Try running MacPro7,1 SMBIOS with the boot-arg agdpmod=ignore
For MSI Navi users, you’ll need to apply the patch mentioned here: Installer not working with 5700XT #901
Specifically, add the following entry under Kernel -> Patch :
# Frozen in the macOS installer after 30 seconds
This is likely due to faulty or outright missing NullCPUPowerManagement, the one hosted on AMD OSX’s Vanilla Guide is corrupted. Go yell at Shannee to fix it. To fix the issue, remove NullCPUPowerManagement from Kernel -> Add and EFI/OC/Kexts then enable DummyPowerManagement under Kernel -> Emulate
# 15h/16h CPU reboot after Data & Privacy screen
Follow directions here after UPDATE 2: Fix Data and Privacy reboot
# macOS frozen right before login
This is a common example of screwed up TSC, for most system add CpuTscSync
For Skylake-X, many firmwares including Asus and EVGA won’t write to all cores. So we’ll need to reset the TSC on cold boot and wake with TSCAdjustReset
(opens new window) . Note that you must open up the kext(ShowPackageContents in finder, Contents -> Info.plist ) and change the Info.plist -> IOKitPersonalities -> IOPropertyMatch -> IOCPUNumber to the number of CPU threads you have starting from 0 (i9 7980xe 18 core would be 35 as it has 36 threads total)
The most common way to see the TSC issue:
Case 1
Case 2
# MediaKit reports not enough space
This error is due to a small EFI, by default Windows will create a 100MB EFI whereas macOS will expect 200MB. To get around this you have 2 way to go:
Expand the EFI of the drive to 200MB(See Google on how)
Format the entire drive instead of just the partition
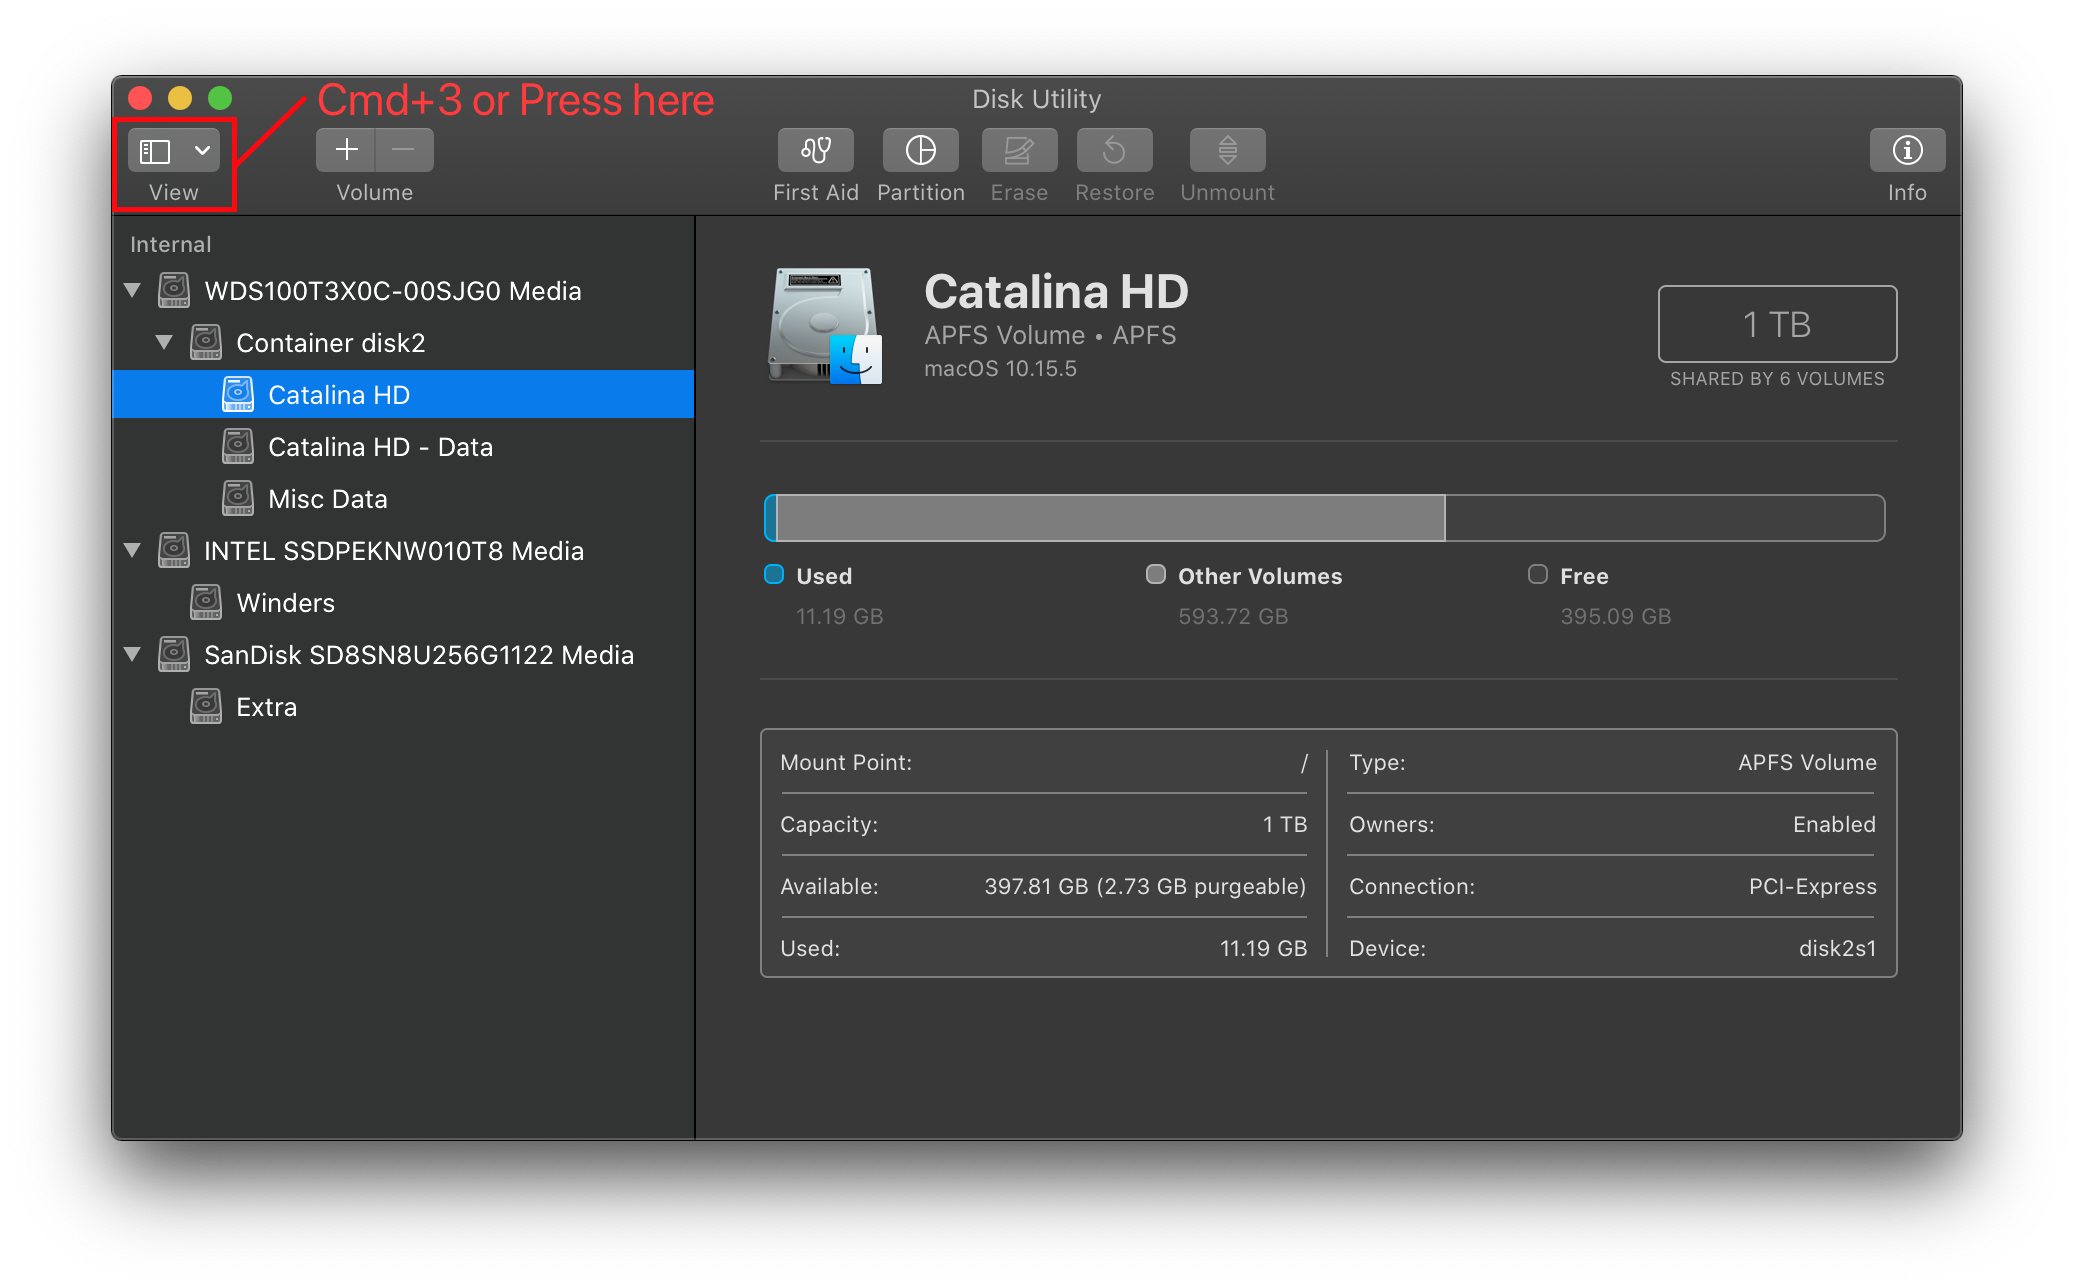
Note by default Disk Utility only shows partitions, press Cmd/Win+2 to show all devices(Alternatively you can press the view button)
Default
Show All Devices(Cmd+2)
# DiskUtility failing to erase
This is either 1(or more) of 5 issues:
Formatting partition and not the drive, see MediaKit reports not enough space
DiskUtility has an odd bug where it will fail on first erase, try erasing again
SATA Hot-plug support in the BIOS is causing issues(try disabling this option)
Old firmware, make sure the drive is on the latest firmware
And finally, you may just have a bad drive
# SATA Drives Not Shown in DiskUtility
Make sure SATA Mode is AHCI in bios
Certain SATA controllers may not be officially supported by macOS, for these cases you’ll want to grab CtlnaAHCIPort.kext
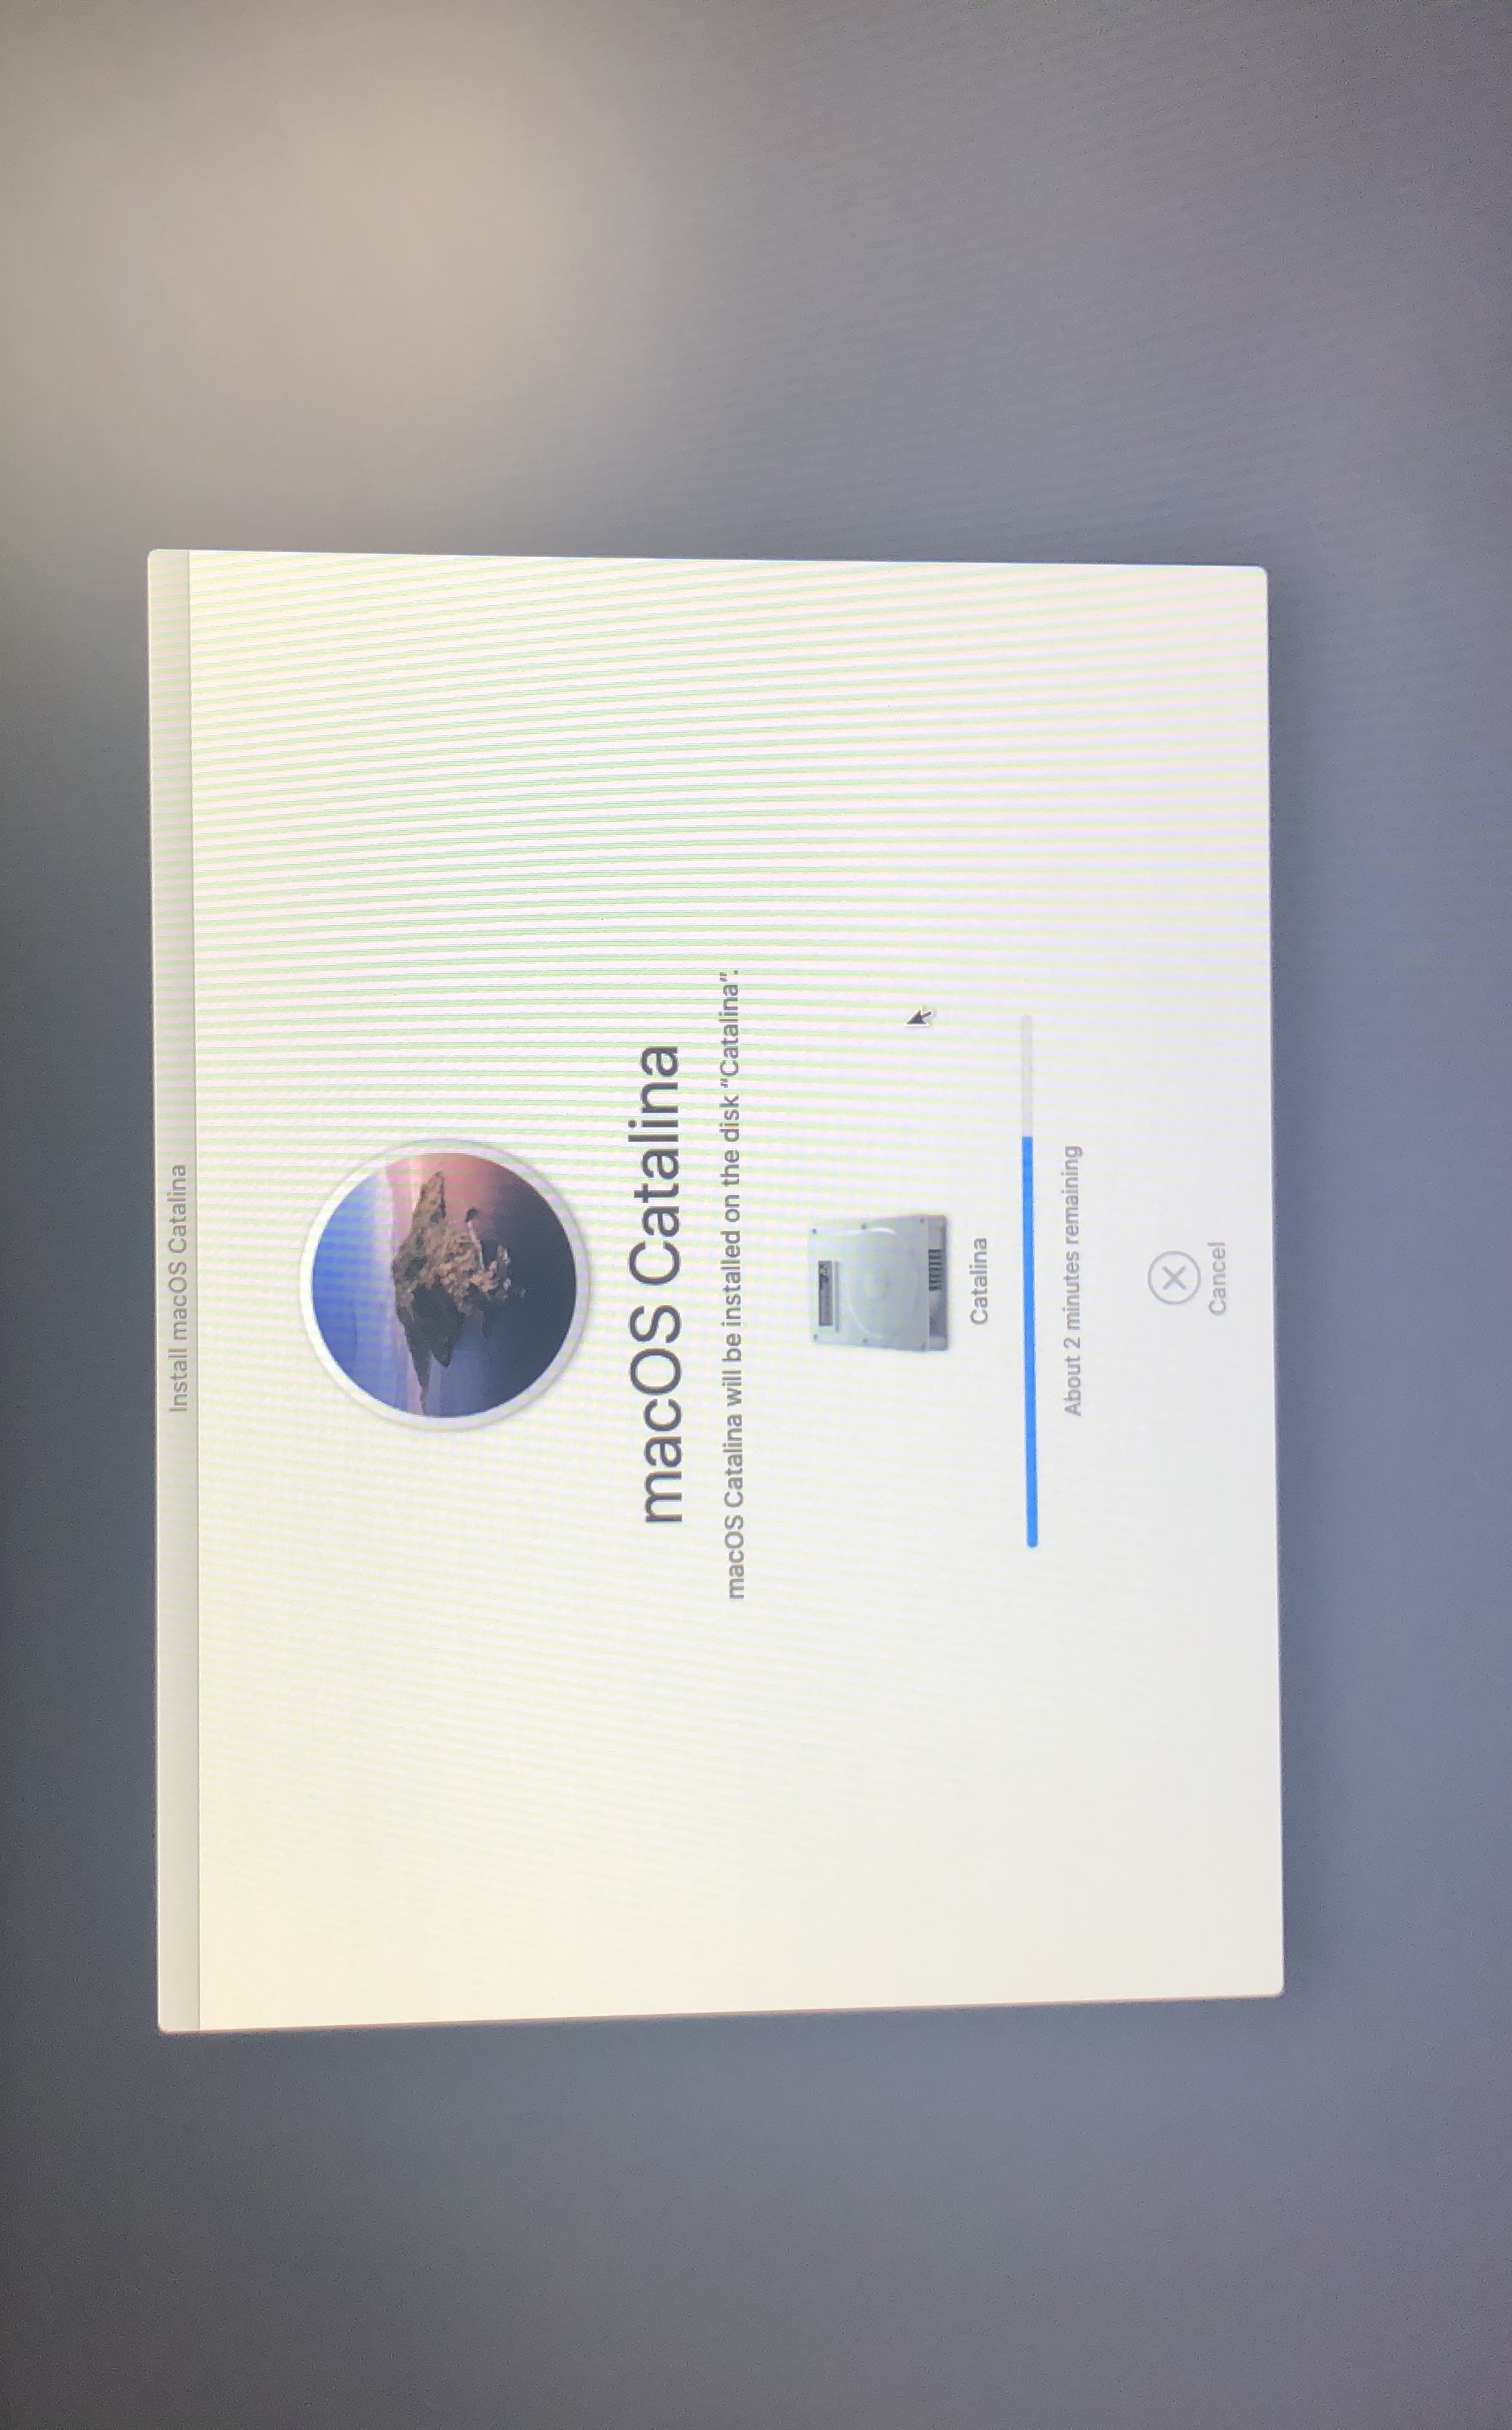
# Stuck at 2 minutes remaining
This error is directly related to the stage at which macOS will write certain NVRAM variables for your system to boot next, and so when there’s issues revolving around NVRAM it’ll stall here.
To resolve, we have a few options:
(opens new window)
Others can set the following in their config.plist:
LegacyEnable -> YES
LegacyOverwrite -> YES
WriteFlash -> YES
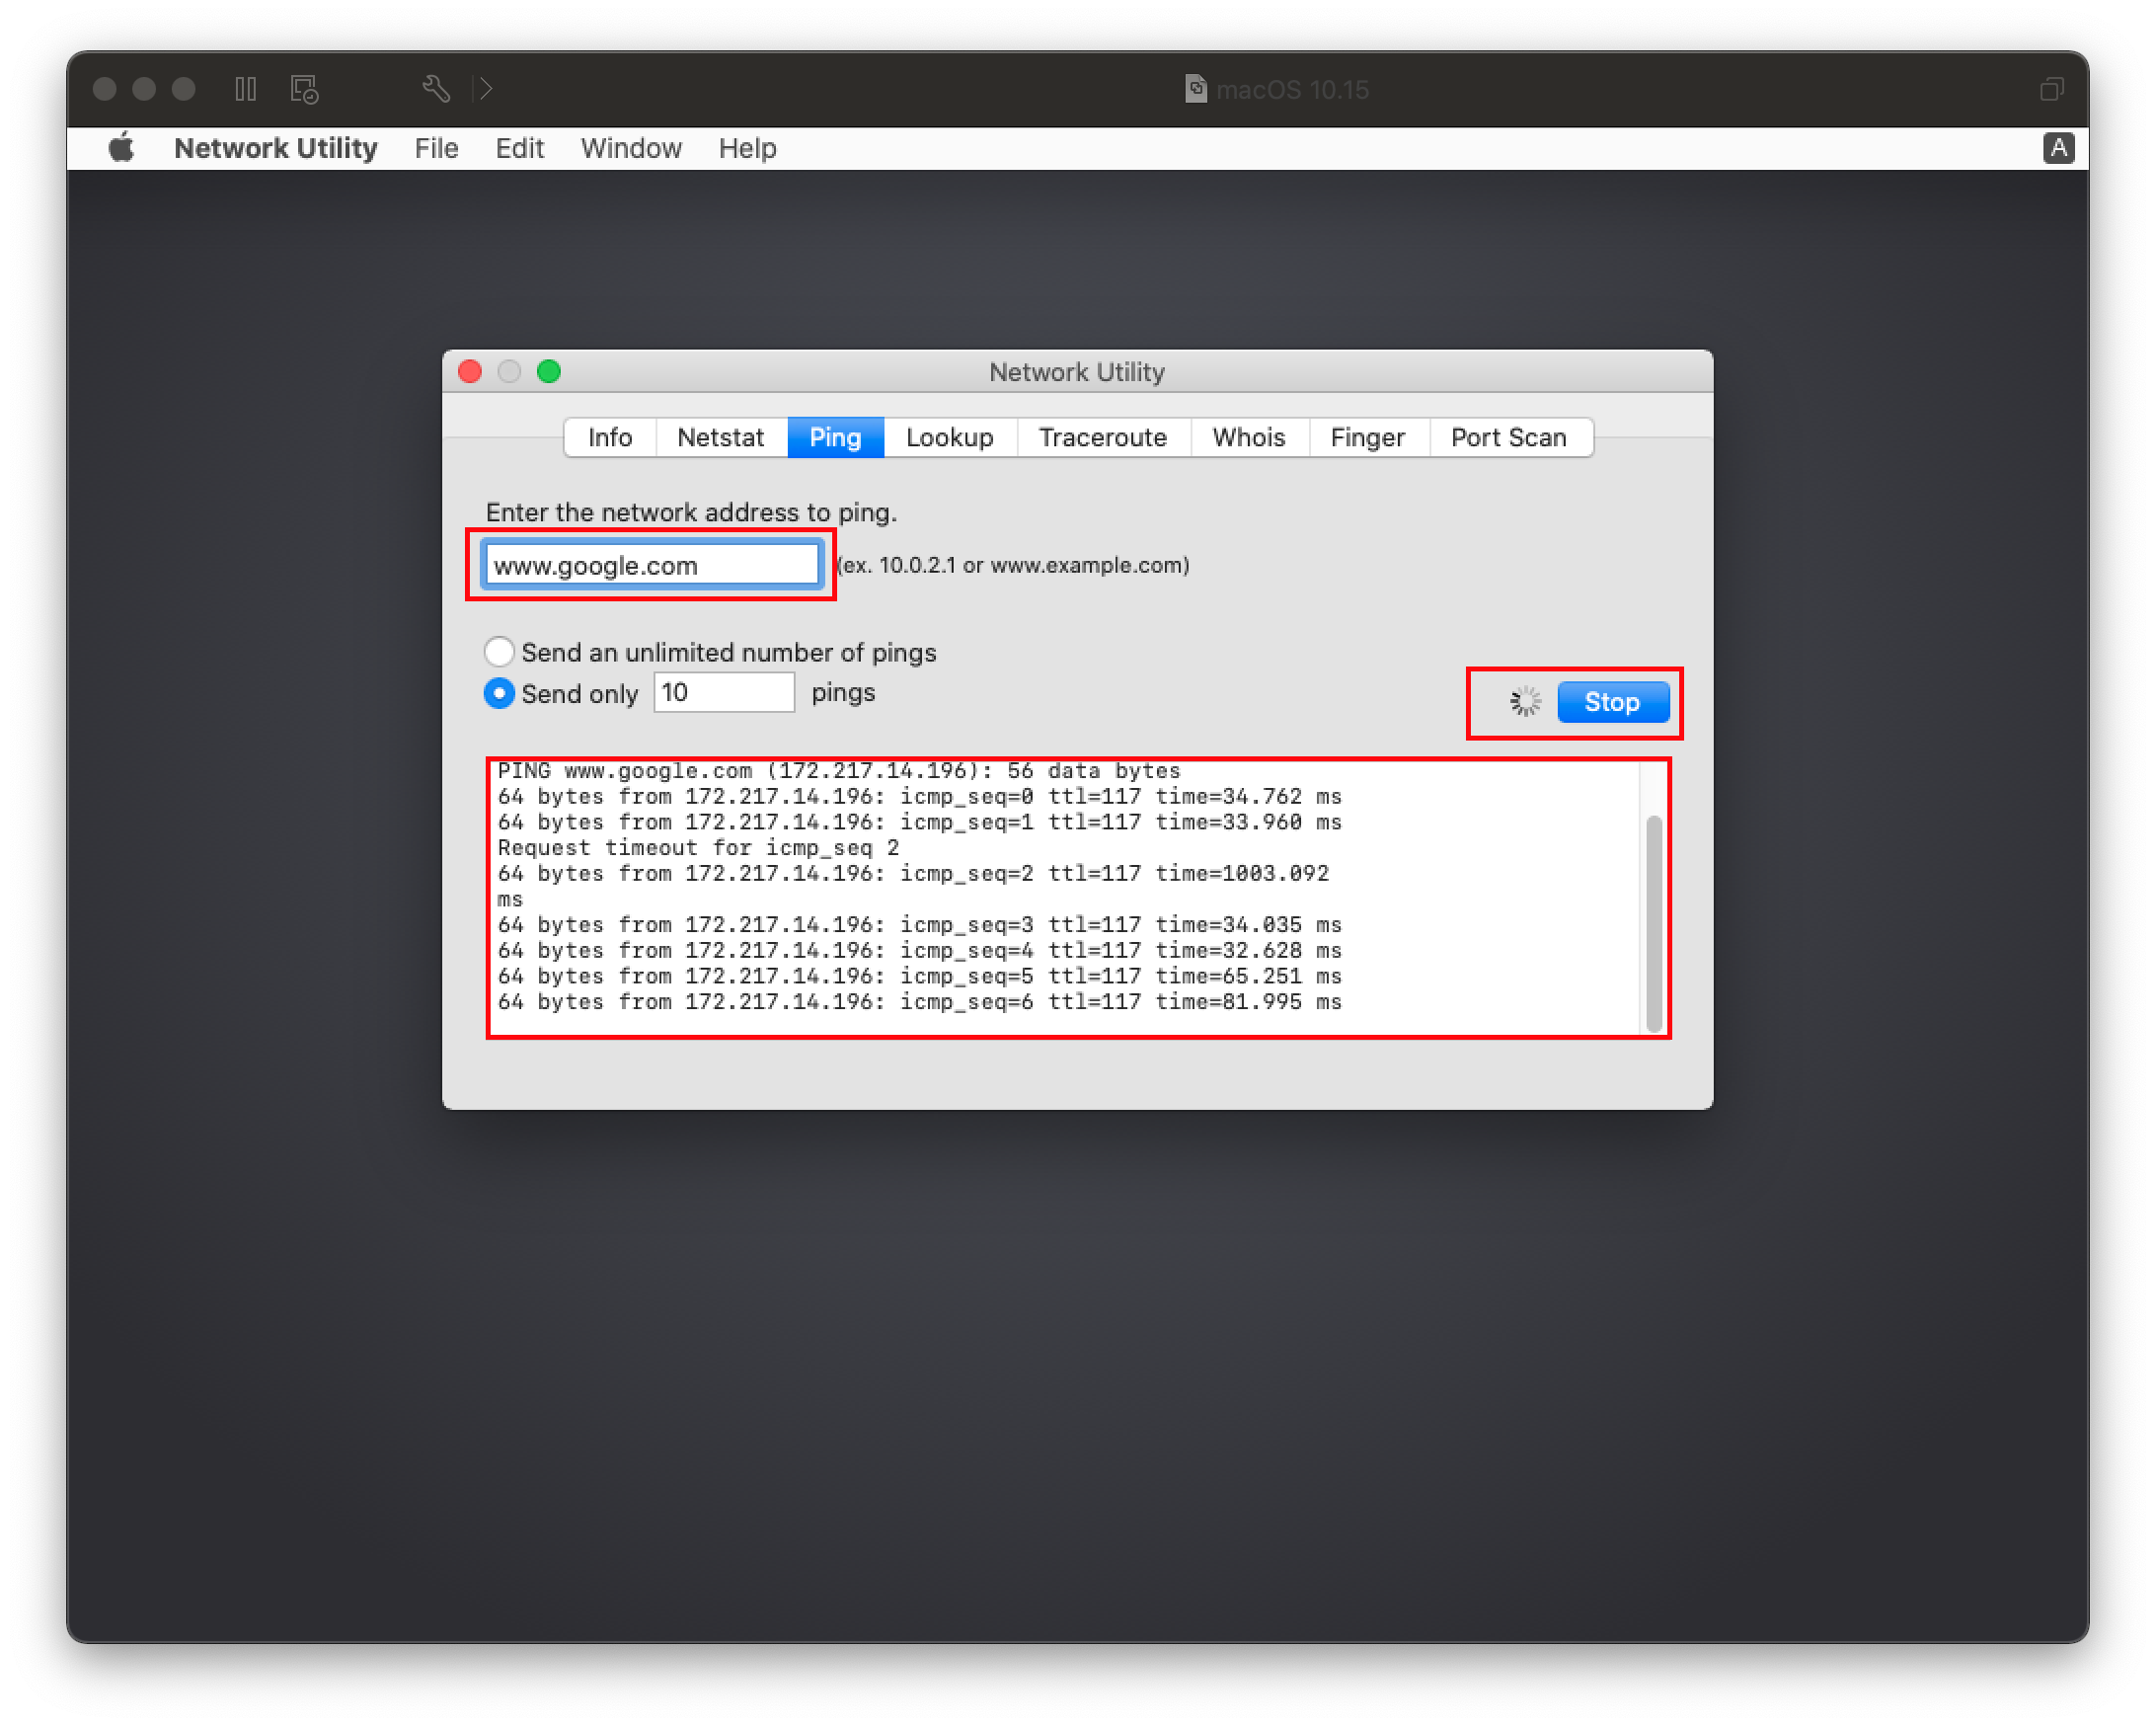
# The recovery server cannot get contacted
If you made your installer in Windows or Linux, then this means your USB installer is recovery based. What this means is that only a small portion of the macOS installer is on disk while the rest must be downloaded from Apple servers in the installer. And reason we do not include full installer guides is due to unstable HFS drivers and other utilities that commonly end up with data corruption.
To resolve the error, you have a few options:
Ensure you have a working Ethernet or WiFi connection
Open Network Utility under Utilties header in the installer and see if your Network Card shows up
If you network card doesn’t show up, it’s likely you’re missing the right Network kext
Please refer here: Ethernet Kexts and Finding your hardware
If the network card does show up, next run ping -c3 www.google.com in the installer’s terminal to ensure your network connection is working
If nothing shows, either your network or kexts are acting up
We recommend trying older variants of kexts in cases where newer builds have weird bugs with your hardware
If it does return something, then the issue is on Apple’s end. You’ll simply need to try to install again another time unfortunately
Check NIC
Ping
# Keyboard and Mouse broken in Big Sur
For certain legacy systems(ie. Core2 Duo/2010 and older), you may notice that while the USB ports work your HID-based devices such as the keyboard and mouse may be broken. To resolve this, add the following patch:
config.plist -> Kernel -> Patch:
Key
Type
Value
Base
String
_isSingleUser
Count
Integer
1
Enabled
Boolean
True
Find
Data
Identifier
String
com.apple.iokit.IOHIDFamily
Limit
Integer
0
Mask
Data
MaxKernel
String
MinKernel
String
20.0.0
Replace
Data
B801000000C3
ReplaceMask
Data
Skip
Integer
0
# Stuck on Your Mac needs a firmware update in order to install to this volume
If you’re being prompted to update your firmware to install with an APFS volume, this likely indicates an outdated SMBIOS table. First, verify the following:
You have PlatformInfo -> Automatic enabled
UpdateSMBIOSMode is set to Create
Make sure CustomSMBIOSGuid is disabled
For Dell and VAIO machines, ensure that CustomSMBIOSGuid is enabled and UpdateSMBIOSMode is set to Custom instead
CustomSMBIOSGuid and UpdateSMBIOSMode should always be in tandem with each other
Using a SMBIOS supported in this version of macOS
ie. you’re not using -no_compat_check
You’re using the latest version of OpenCore
If you still receive this error, then there’s likely some outdated SMBIOS info in OpenCore itself. We recommend changing to a similar SMBIOS and see if this is resolved. For a full list of SMBIOS, see here: Choosing the right SMBIOS