3.5 Git Branching — Remote Branches
Remote Branches
Remote references are references (pointers) in your remote repositories, including branches, tags, and so on. You can get a full list of remote references explicitly with git ls-remote , or git remote show for remote branches as well as more information. Nevertheless, a more common way is to take advantage of remote-tracking branches.
Remote-tracking branches are references to the state of remote branches. They’re local references that you can’t move; Git moves them for you whenever you do any network communication, to make sure they accurately represent the state of the remote repository. Think of them as bookmarks, to remind you where the branches in your remote repositories were the last time you connected to them.
Remote-tracking branch names take the form /
. For instance, if you wanted to see what the master branch on your origin remote looked like as of the last time you communicated with it, you would check the origin/master branch. If you were working on an issue with a partner and they pushed up an iss53 branch, you might have your own local iss53 branch, but the branch on the server would be represented by the remote-tracking branch origin/iss53 .
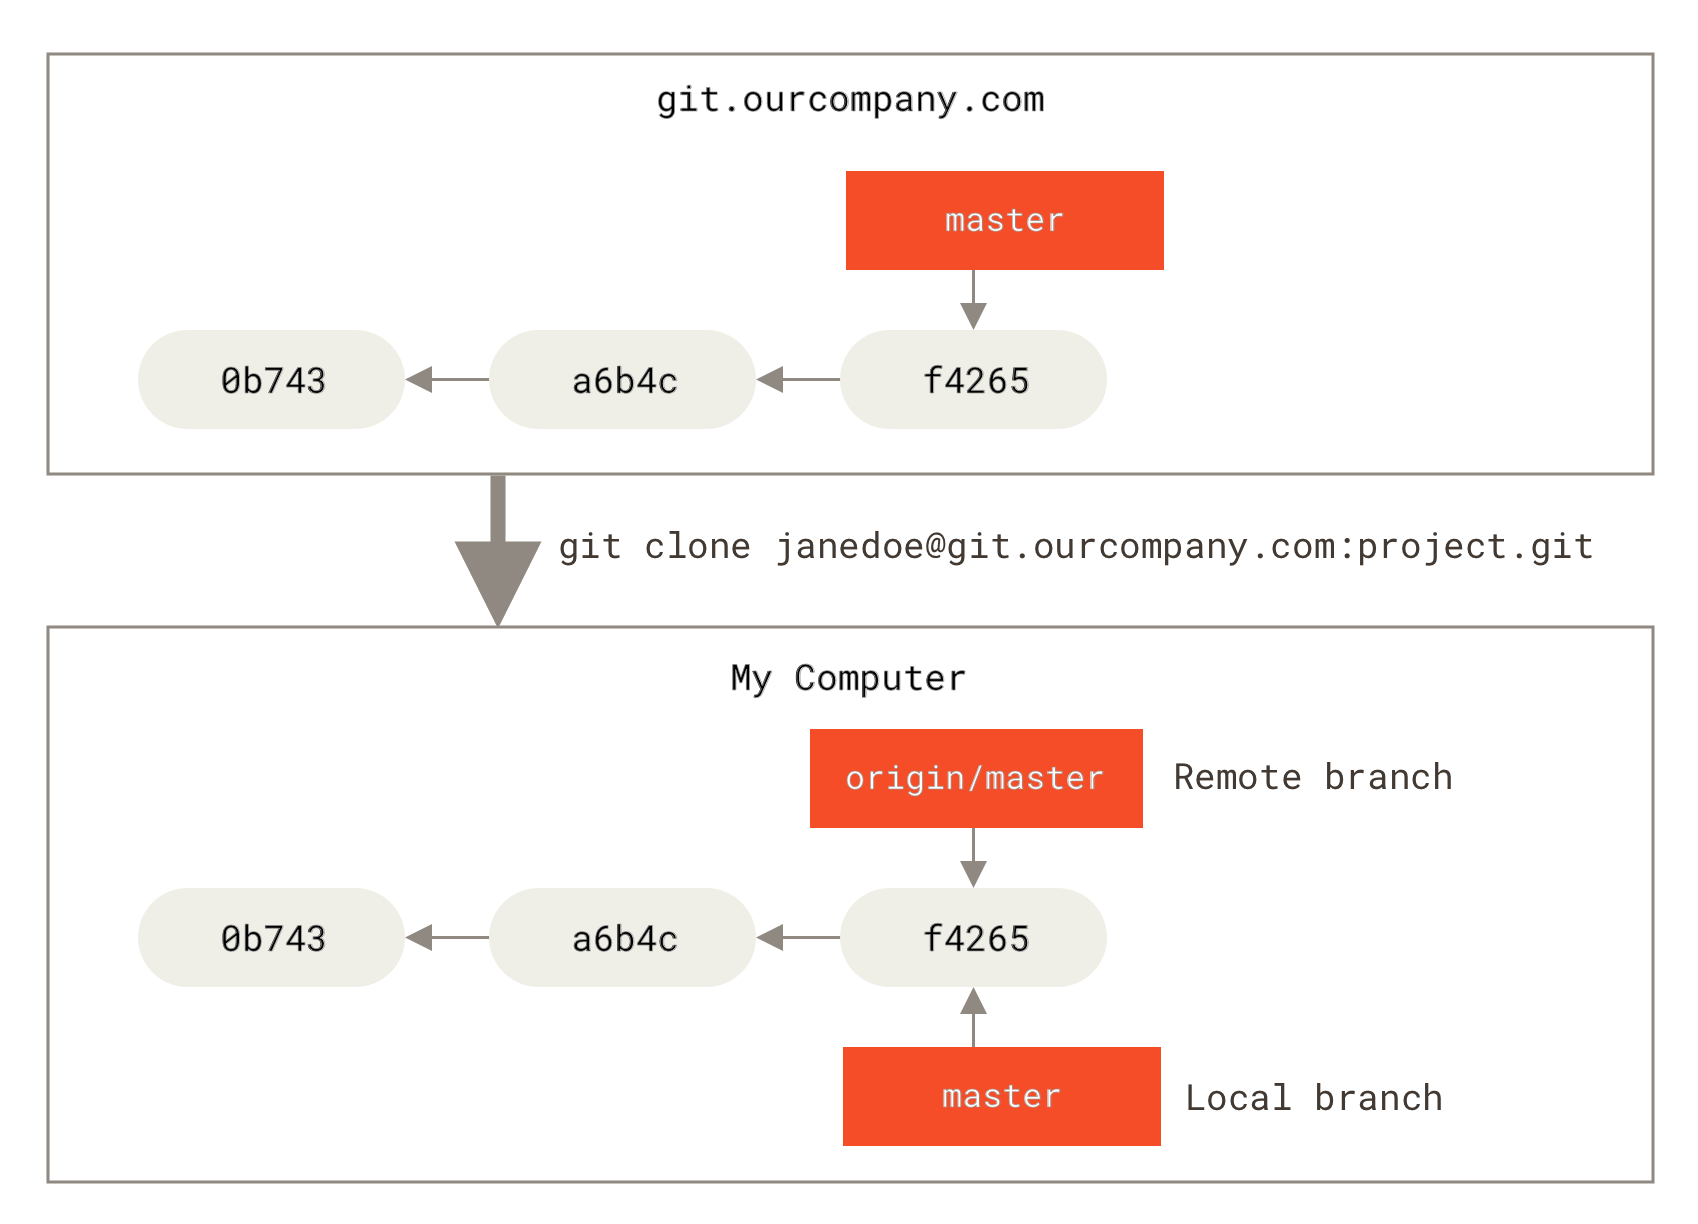
This may be a bit confusing, so let’s look at an example. Let’s say you have a Git server on your network at git.ourcompany.com . If you clone from this, Git’s clone command automatically names it origin for you, pulls down all its data, creates a pointer to where its master branch is, and names it origin/master locally. Git also gives you your own local master branch starting at the same place as origin’s master branch, so you have something to work from.
Just like the branch name “master” does not have any special meaning in Git, neither does “origin”. While “master” is the default name for a starting branch when you run git init which is the only reason it’s widely used, “origin” is the default name for a remote when you run git clone . If you run git clone -o booyah instead, then you will have booyah/master as your default remote branch.
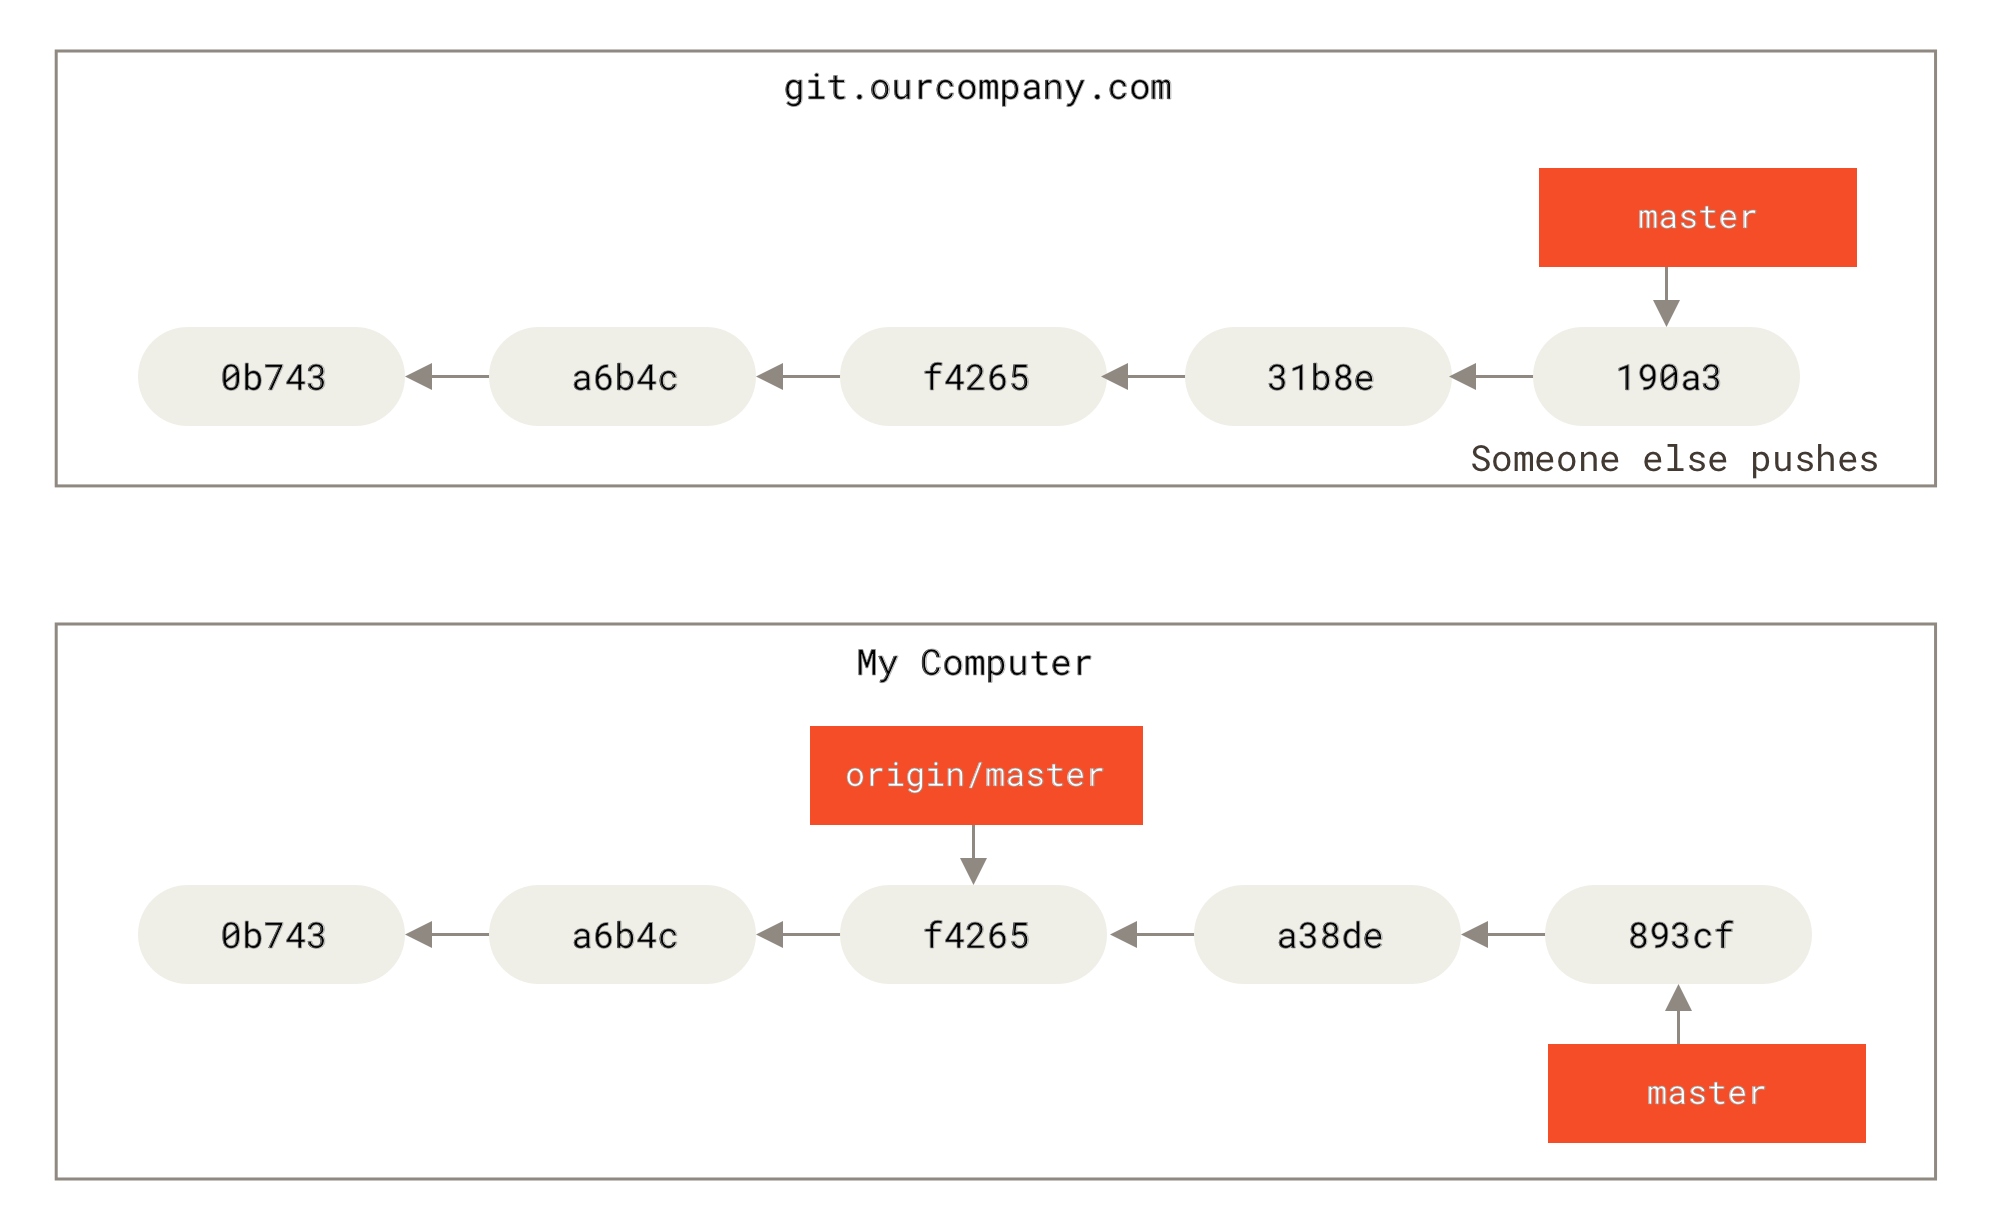
If you do some work on your local master branch, and, in the meantime, someone else pushes to git.ourcompany.com and updates its master branch, then your histories move forward differently. Also, as long as you stay out of contact with your origin server, your origin/master pointer doesn’t move.
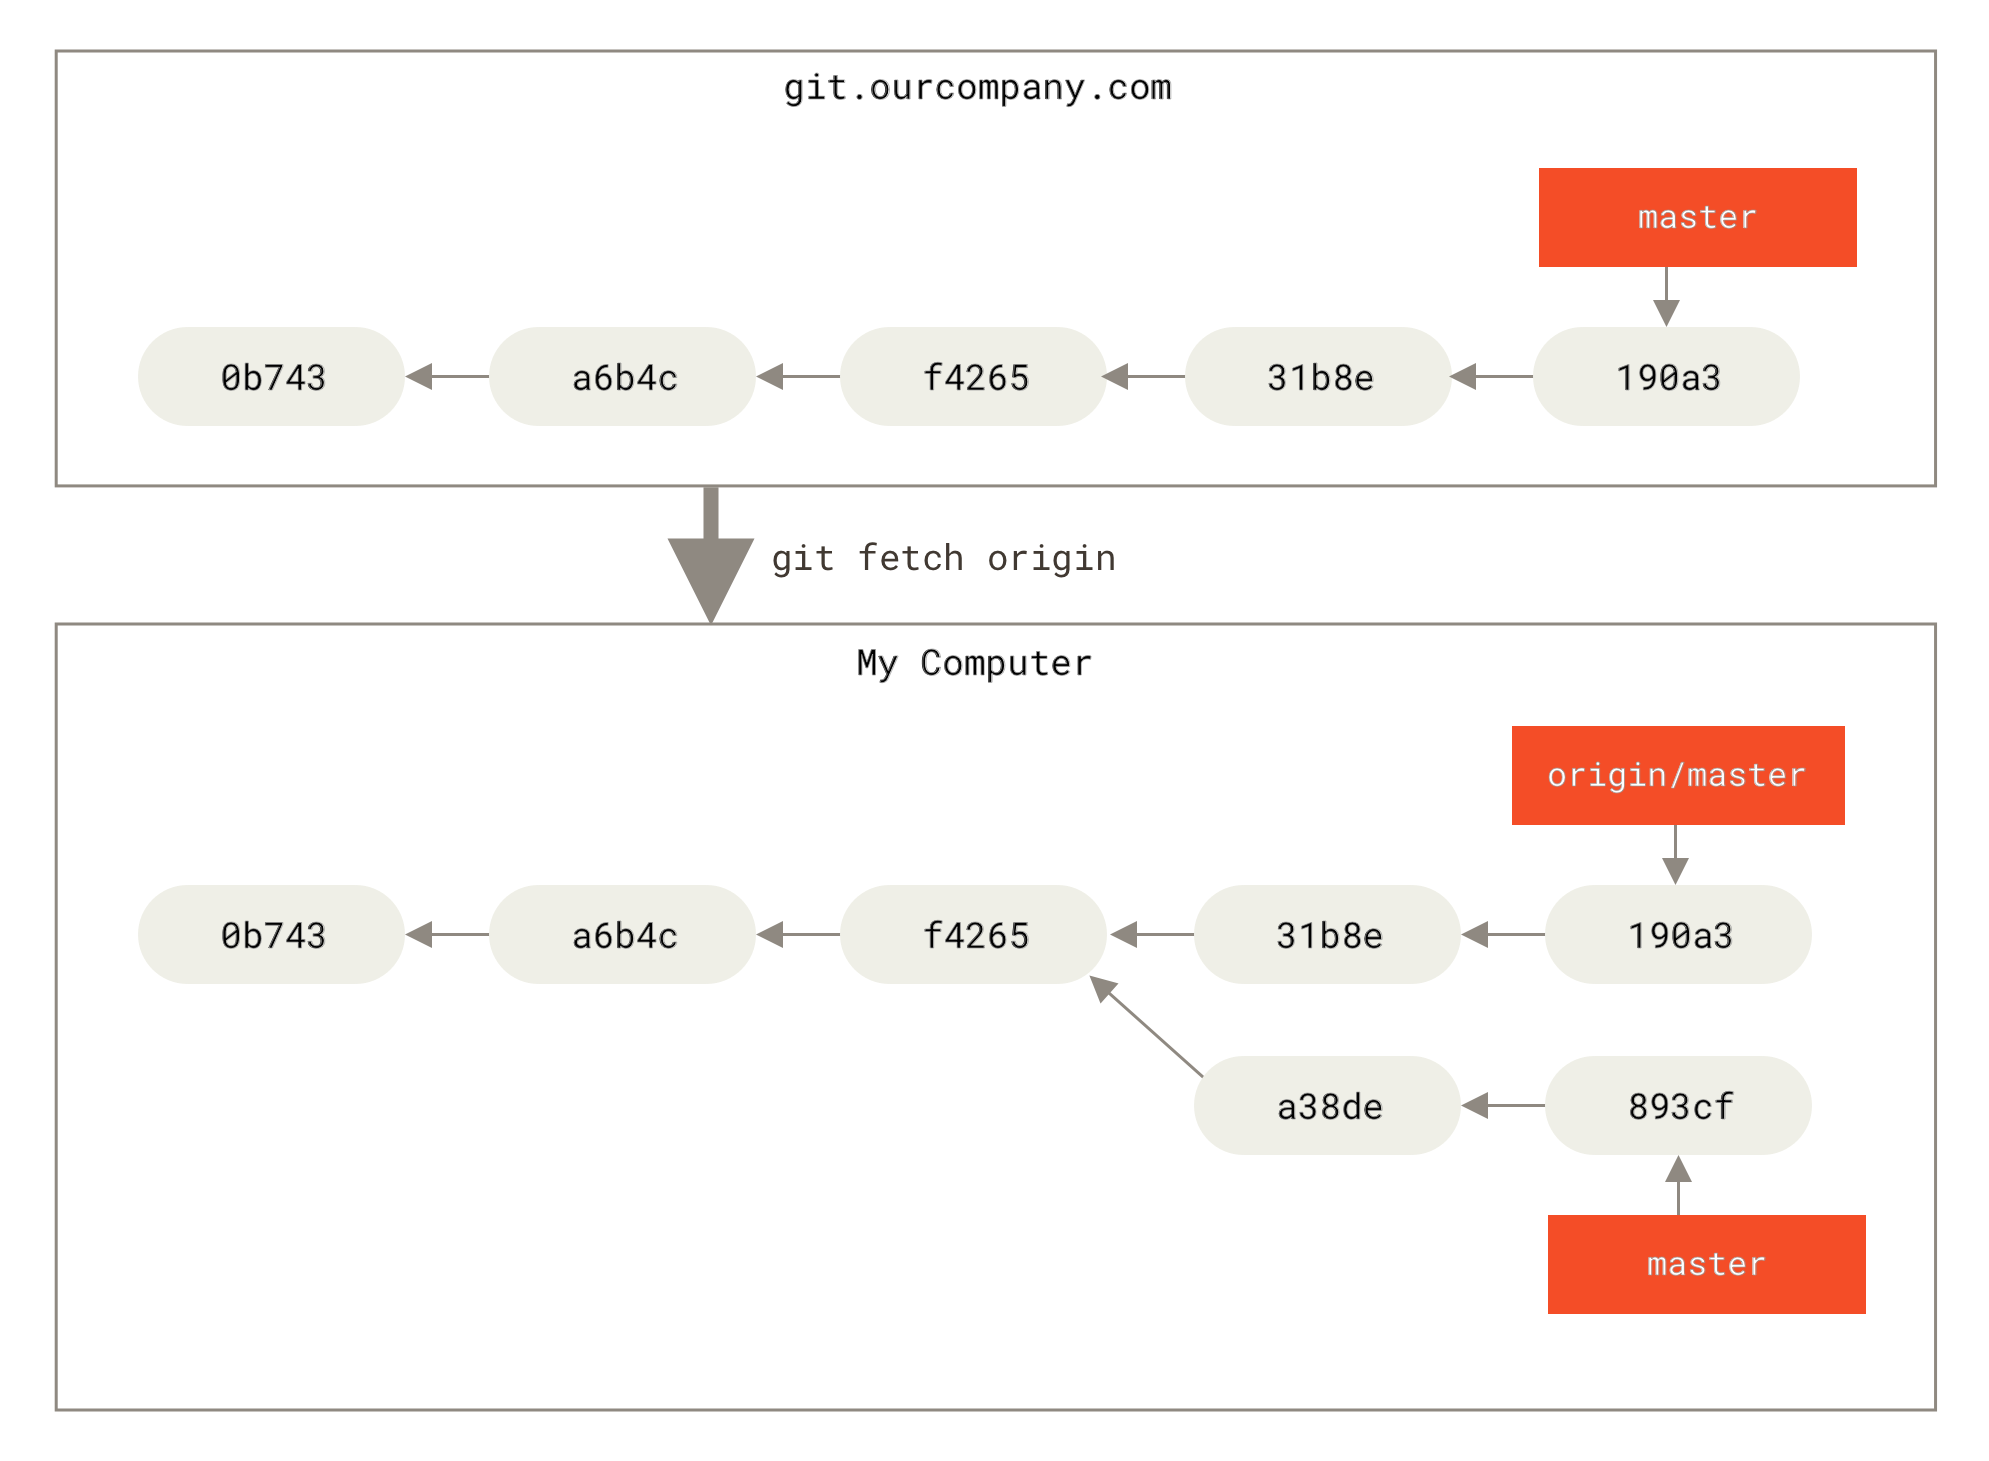
To synchronize your work with a given remote, you run a git fetch command (in our case, git fetch origin ). This command looks up which server “origin” is (in this case, it’s git.ourcompany.com ), fetches any data from it that you don’t yet have, and updates your local database, moving your origin/master pointer to its new, more up-to-date position.
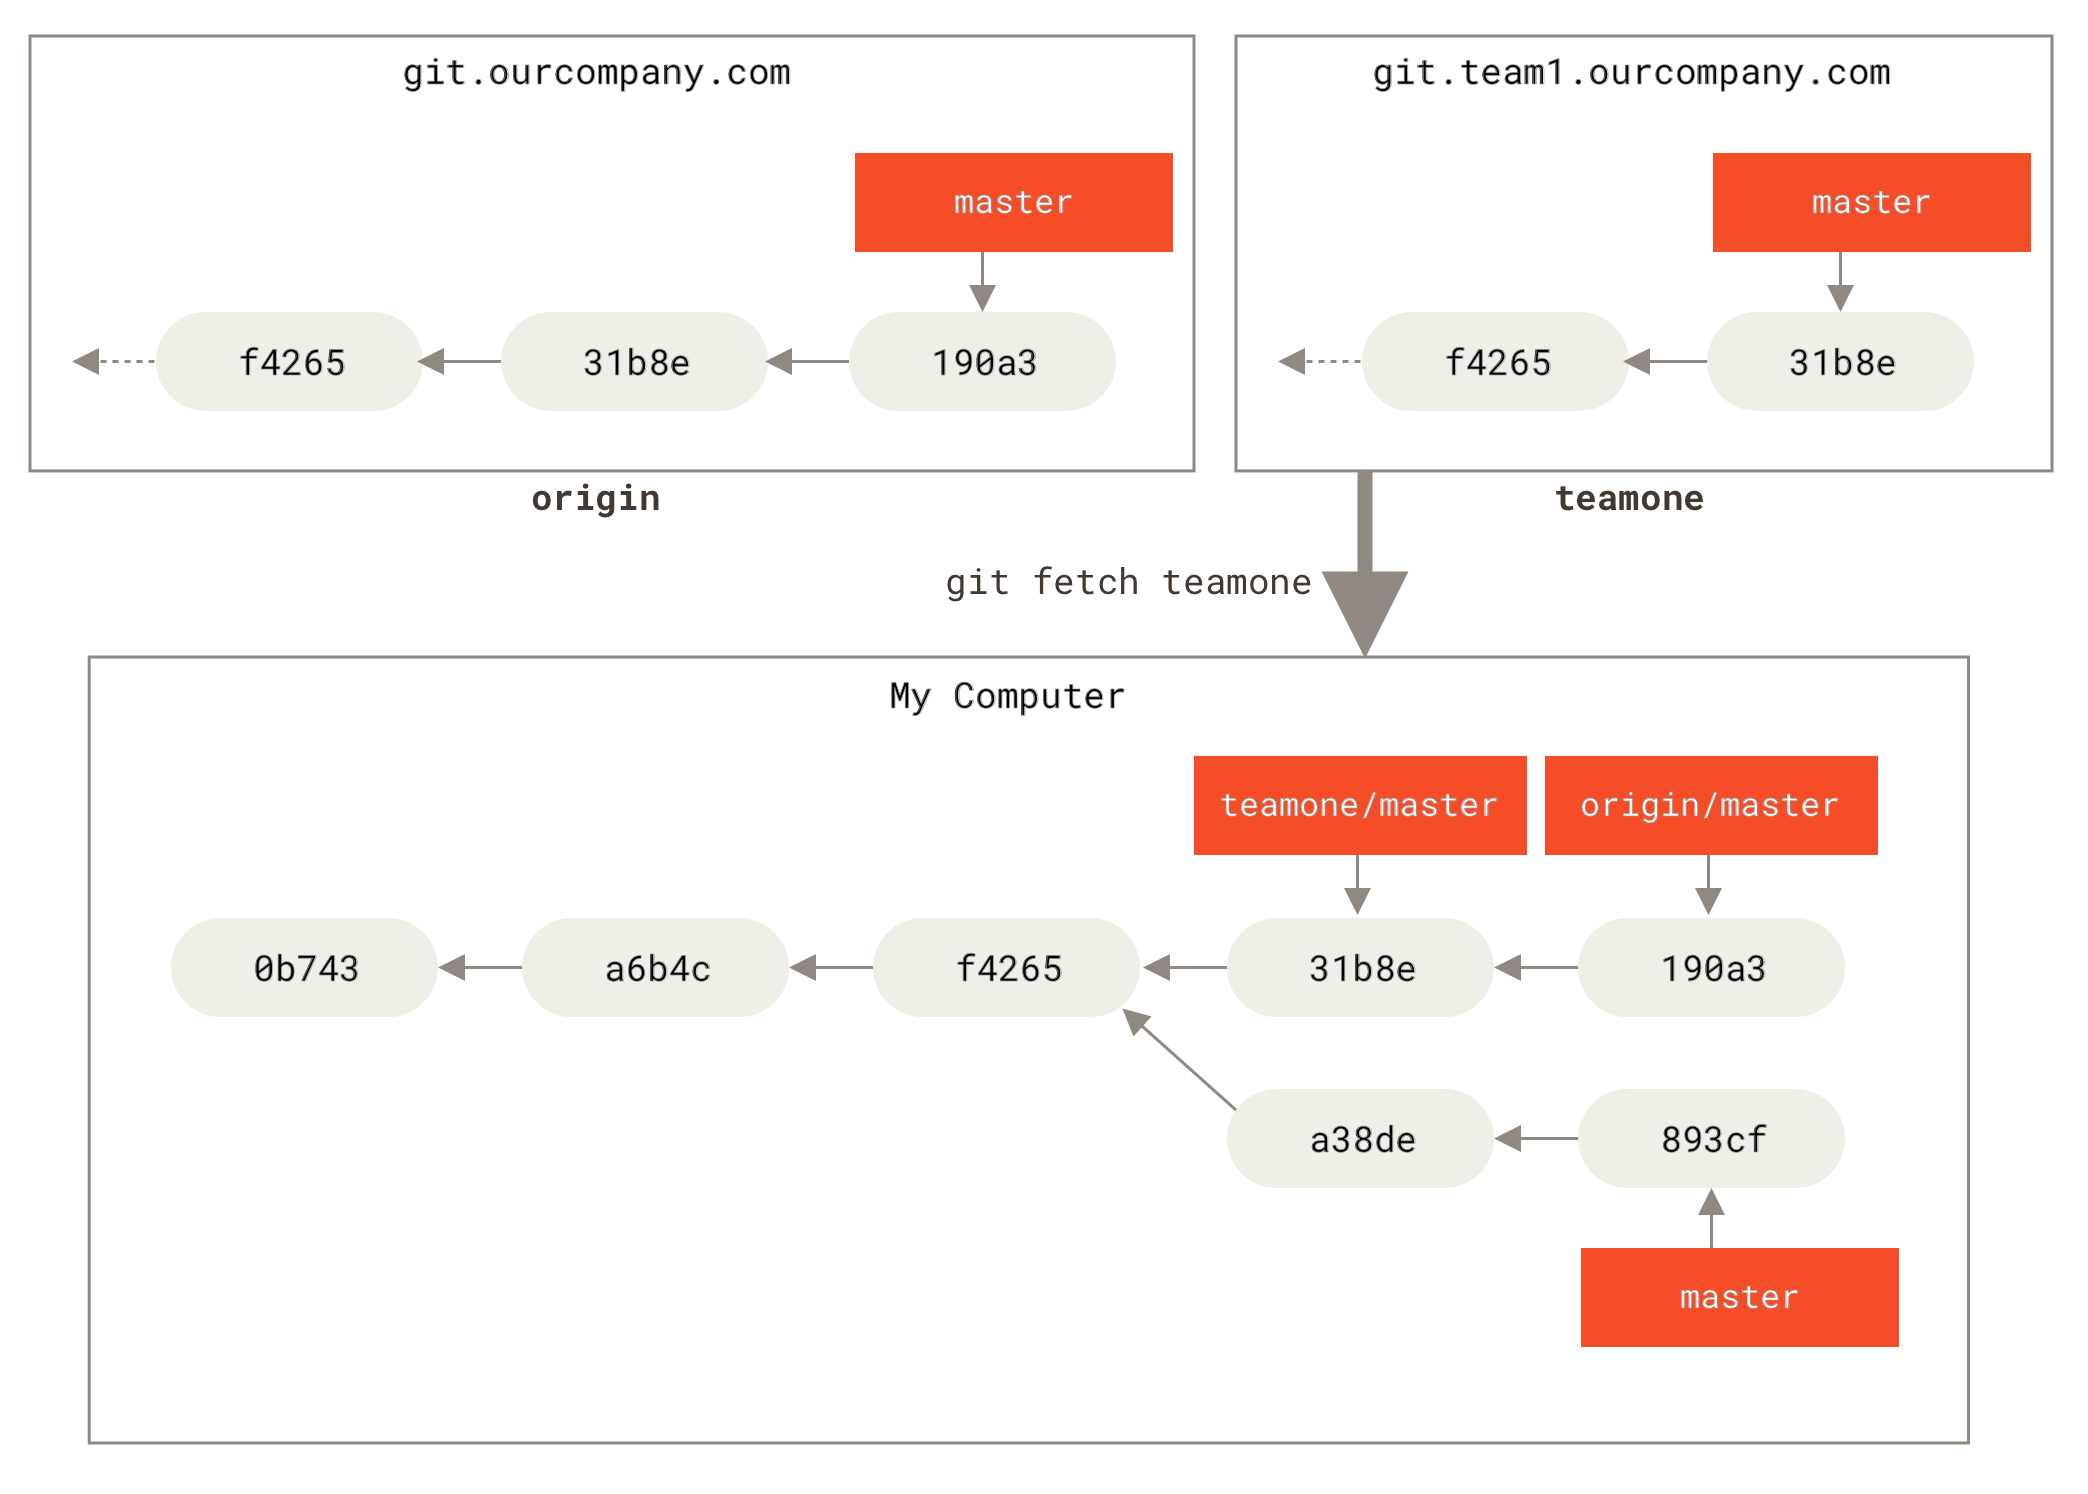
To demonstrate having multiple remote servers and what remote branches for those remote projects look like, let’s assume you have another internal Git server that is used only for development by one of your sprint teams. This server is at git.team1.ourcompany.com . You can add it as a new remote reference to the project you’re currently working on by running the git remote add command as we covered in Git Basics. Name this remote teamone , which will be your shortname for that whole URL.
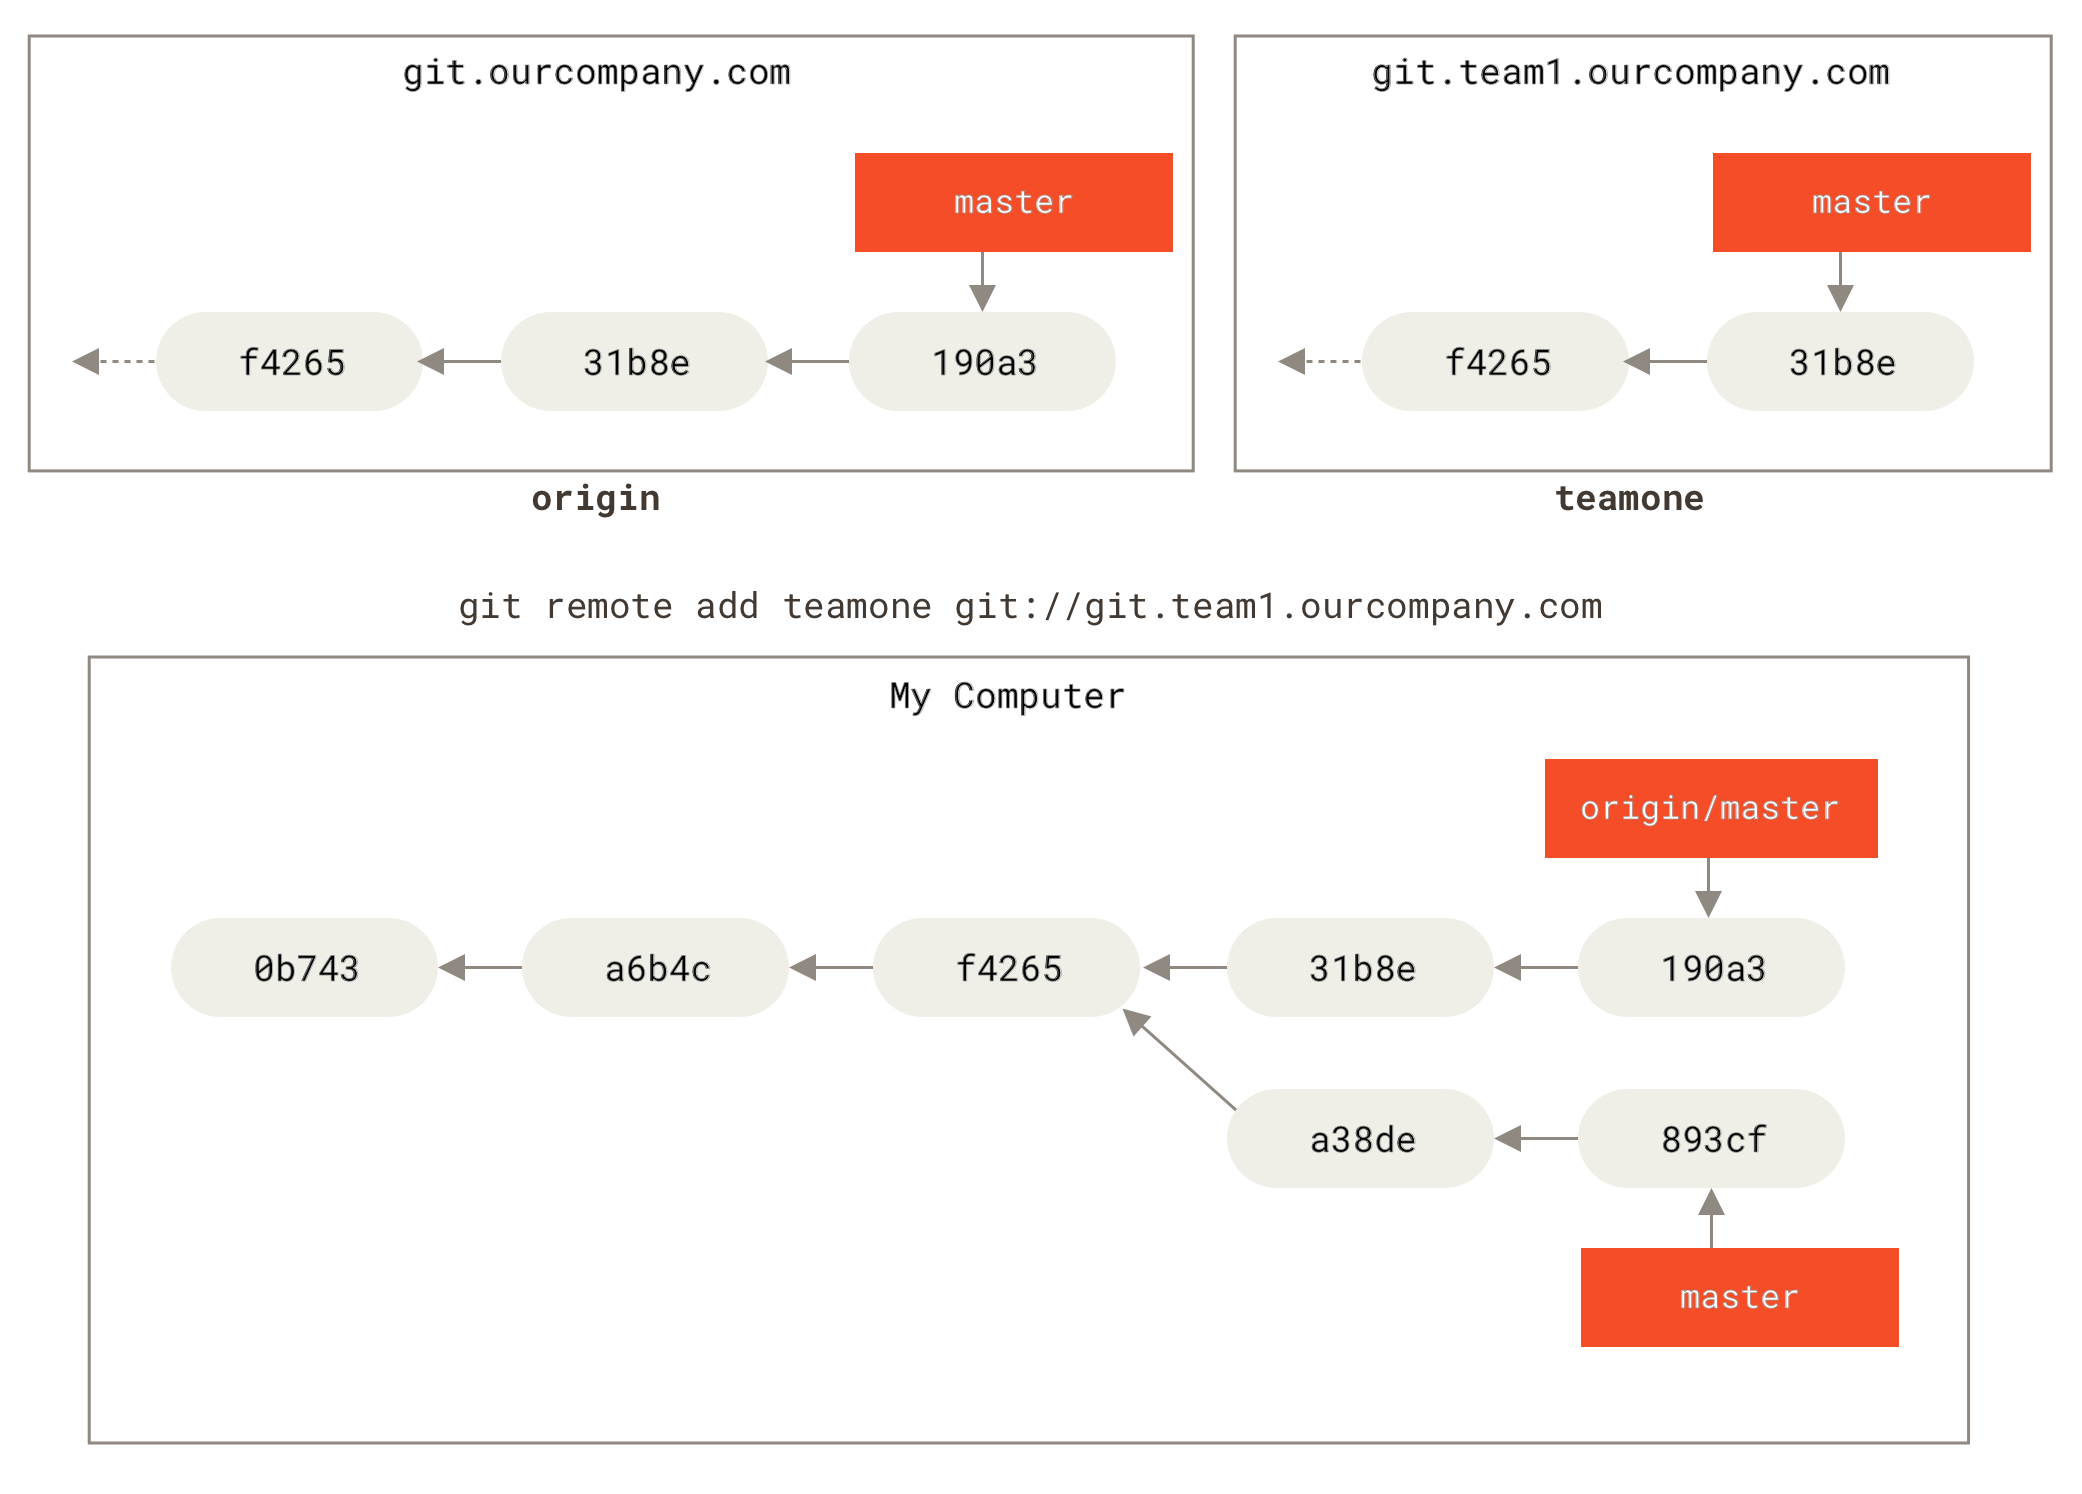
Now, you can run git fetch teamone to fetch everything the remote teamone server has that you don’t have yet. Because that server has a subset of the data your origin server has right now, Git fetches no data but sets a remote-tracking branch called teamone/master to point to the commit that teamone has as its master branch.
Pushing
When you want to share a branch with the world, you need to push it up to a remote to which you have write access. Your local branches aren’t automatically synchronized to the remotes you write to — you have to explicitly push the branches you want to share. That way, you can use private branches for work you don’t want to share, and push up only the topic branches you want to collaborate on.
If you have a branch named serverfix that you want to work on with others, you can push it up the same way you pushed your first branch. Run git push
:
This is a bit of a shortcut. Git automatically expands the serverfix branchname out to refs/heads/serverfix:refs/heads/serverfix , which means, “Take my serverfix local branch and push it to update the remote’s serverfix branch.” We’ll go over the refs/heads/ part in detail in Git Internals, but you can generally leave it off. You can also do git push origin serverfix:serverfix , which does the same thing — it says, “Take my serverfix and make it the remote’s serverfix.” You can use this format to push a local branch into a remote branch that is named differently. If you didn’t want it to be called serverfix on the remote, you could instead run git push origin serverfix:awesomebranch to push your local serverfix branch to the awesomebranch branch on the remote project.
If you’re using an HTTPS URL to push over, the Git server will ask you for your username and password for authentication. By default it will prompt you on the terminal for this information so the server can tell if you’re allowed to push.
If you don’t want to type it every single time you push, you can set up a “credential cache”. The simplest is just to keep it in memory for a few minutes, which you can easily set up by running git config —global credential.helper cache .
For more information on the various credential caching options available, see Credential Storage.
The next time one of your collaborators fetches from the server, they will get a reference to where the server’s version of serverfix is under the remote branch origin/serverfix :
It’s important to note that when you do a fetch that brings down new remote-tracking branches, you don’t automatically have local, editable copies of them. In other words, in this case, you don’t have a new serverfix branch — you have only an origin/serverfix pointer that you can’t modify.
To merge this work into your current working branch, you can run git merge origin/serverfix . If you want your own serverfix branch that you can work on, you can base it off your remote-tracking branch:
This gives you a local branch that you can work on that starts where origin/serverfix is.
Tracking Branches
Checking out a local branch from a remote-tracking branch automatically creates what is called a “tracking branch” (and the branch it tracks is called an “upstream branch”). Tracking branches are local branches that have a direct relationship to a remote branch. If you’re on a tracking branch and type git pull , Git automatically knows which server to fetch from and which branch to merge in.
When you clone a repository, it generally automatically creates a master branch that tracks origin/master . However, you can set up other tracking branches if you wish — ones that track branches on other remotes, or don’t track the master branch. The simple case is the example you just saw, running git checkout -b
/
. This is a common enough operation that Git provides the —track shorthand:
In fact, this is so common that there’s even a shortcut for that shortcut. If the branch name you’re trying to checkout (a) doesn’t exist and (b) exactly matches a name on only one remote, Git will create a tracking branch for you:
To set up a local branch with a different name than the remote branch, you can easily use the first version with a different local branch name:
Now, your local branch sf will automatically pull from origin/serverfix .
If you already have a local branch and want to set it to a remote branch you just pulled down, or want to change the upstream branch you’re tracking, you can use the -u or —set-upstream-to option to git branch to explicitly set it at any time.
When you have a tracking branch set up, you can reference its upstream branch with the @
If you want to see what tracking branches you have set up, you can use the -vv option to git branch . This will list out your local branches with more information including what each branch is tracking and if your local branch is ahead, behind or both.
So here we can see that our iss53 branch is tracking origin/iss53 and is “ahead” by two, meaning that we have two commits locally that are not pushed to the server. We can also see that our master branch is tracking origin/master and is up to date. Next we can see that our serverfix branch is tracking the server-fix-good branch on our teamone server and is ahead by three and behind by one, meaning that there is one commit on the server we haven’t merged in yet and three commits locally that we haven’t pushed. Finally we can see that our testing branch is not tracking any remote branch.
It’s important to note that these numbers are only since the last time you fetched from each server. This command does not reach out to the servers, it’s telling you about what it has cached from these servers locally. If you want totally up to date ahead and behind numbers, you’ll need to fetch from all your remotes right before running this. You could do that like this:
Pulling
While the git fetch command will fetch all the changes on the server that you don’t have yet, it will not modify your working directory at all. It will simply get the data for you and let you merge it yourself. However, there is a command called git pull which is essentially a git fetch immediately followed by a git merge in most cases. If you have a tracking branch set up as demonstrated in the last section, either by explicitly setting it or by having it created for you by the clone or checkout commands, git pull will look up what server and branch your current branch is tracking, fetch from that server and then try to merge in that remote branch.
Generally it’s better to simply use the fetch and merge commands explicitly as the magic of git pull can often be confusing.
Deleting Remote Branches
Suppose you’re done with a remote branch — say you and your collaborators are finished with a feature and have merged it into your remote’s master branch (or whatever branch your stable codeline is in). You can delete a remote branch using the —delete option to git push . If you want to delete your serverfix branch from the server, you run the following:
Basically all this does is remove the pointer from the server. The Git server will generally keep the data there for a while until a garbage collection runs, so if it was accidentally deleted, it’s often easy to recover.
Источник
Git не пушатся изменения?
Изучаю git. Решил запулить два файла в репозиторий, директорию инициализировал и сделал
«рабочая директория выглядит так
. socket_berkley
. / . \
. server.py. client.py
»
все нормально все запушилось далее в рабочей директории решил создать каталог socket и в нем каталог echo-server
и копировать туда те два файла
далее снова запушил это дело
«стало
. socket_berkley
. |
. socket
. |
. echo-server
. /. \
. client.py. server.py
»
git log выглядел так
потом я решил откатить изменения, то есть удаляются те 2 директории
git checkout 5fea3bb
на локальном компьютере снова
»
. socket_berkley
. / . \
. server.py. client.py
»
а на github
»
. socket_berkley
. |
. socket
. |
. echo-server
. /. \
. client.py. server.py
»
поэтому я решил запушить изменения на гитхаб, тоесть вернуть его к первому состоянию
Выполнив команду
поняв ту ошибку выполнил
и тут пошли ошибки, затем захотел вернуться ко второму состоянию
»
. socket_berkley
. |
. socket
. |
. echo-server
. /. \
. client.py. server.py
«
в логе видно что исчез один коммит к которому я хотел вернуться
решил вручную снова восстановить те директории
он почему то не сработал
git log && git status
решил добавить комментарии к коду и снова add && commit
git status показывает это, по мне так что то не так
Источник
Branch master set up to track remote branch master from origin что значит
Сегодня разберем основные и самые часто повторяющиеся команды Git. Этого минимума вам вполне хватит для того, чтобы чувствовать себя с Git уверенно и непринужденно
- git init — Чтобы инициализировать репозиторий Git здесь. Initialized empty Git repository in /.git/(, наш каталог «octobox» теперь имеет пустой репозиторий в /.git/. )
- git status — чтобы узнать, каково текущее состояние нашего проекта
После того, как мы создадим там некий тесовый файл эта команда вернет — - git add octacat.txt —Чтобы Git начал отслеживать изменения, внесенные в octocat.txt, мы сначала должны добавить его в промежуточную область с помощью git add.
Теперь если еще раз вызвать команду и проверить статус — git status, то получит следующее:
Файлы, перечисленные здесь, находятся в области промежуточного хранения, и они еще не находятся в нашем репозитории. Мы могли добавлять или удалять файлы со сцены, прежде чем их хранить в репозитории.
Чтобы сохранить наши поэтапные изменения, мы запускаем команду commit с сообщением о том, что мы изменили.
git commit -m «Add cute octocat story»— Коммит с мессанджем:
Вы также можете использовать подстановочные знаки, если хотите добавить много файлов одного типа. Обратите внимание, что я добавил кучу файлов .txt в ваш каталог ниже.
Я поместил некоторые в каталог с именем «octofamily», а некоторые другие оказались в корне нашего каталога «octobox». К счастью, мы можем добавить все новые файлы, используя шаблон с добавлением git. Не забывайте цитаты!
Итак, мы совершили несколько коммитов. Теперь давайте просмотрим их, чтобы узнать, что мы изменили.
К счастью для нас, есть git log. Подумайте о журнале Git как о журнале, который помнит все изменения, которые мы совершили до сих пор, в том порядке, в котором мы их совершили.
git remote add origin https://github.com/try-git/try_git.git — Удаленные репозитория
Мы пошли вперед и создали новый пустой репозиторий GitHub для использования с Try Git по адресу https://github.com/try-git/try_git.git. Чтобы подтолкнуть наш локальный репо к серверу GitHub, нам нужно будет добавить удаленный репозиторий.
Эта команда берет удаленное имя и URL-адрес репозитория, который в вашем случае — https://github.com/try-git/try_git.git.
Идем дальше и запускаем git remote add с опциями ниже:
Ответа не будет.
git push -u origin master— Pushing Remotely
Команда push сообщает Git, куда положить наши коммиты, когда мы готовы, и теперь мы готовы. Итак, давайте переместим наши локальные изменения в наш исходный репо (на GitHub).
Имя нашего пульта — origin, а имя локальной ветви по умолчанию — master. Параметр -u указывает Git запомнить параметры, чтобы в следующий раз мы могли просто запустить git push, а Git будет знать, что делать.
git pull origin master— Pulling Remotely
Давайте притворимся, что прошло какое-то время. Мы пригласили других людей в наш проект GitHub, которые потянули ваши изменения, сделали свои собственные коммиты и подтолкнули их.
Мы можем проверить изменения в нашем репозитории GitHub и удалить все новые изменения, запустив:
git diff HEAD— Различия
О, похоже, были некоторые дополнения и изменения в семействе octocat. Давайте взглянем на то, что отличается от нашего последнего коммита, используя команду git diff.
В этом случае нам нужен diff нашего последнего коммита, который мы можем использовать для указания указателя HEAD.
git add octofamily/octodog.txt— Поэтапные различия
Еще одно отличное использование для diff — это просмотр изменений в уже установленных файлах. Помните, что поэтапные файлы — это файлы, которые мы сказали git, которые готовы к фиксации.
Давайте применим git add к stage octofamily / octodog.txt, который я только что добавил в семейство для вас.
Ответа нет.
git diff —staged— Поэтапные различия (продолжение)
Хорошо, теперь идем дальше и запускаем git diff с опцией —staged, чтобы увидеть изменения, которые вы только что организовали. Вы должны увидеть, что octodog.txt был создан.
git reset octofamily/octodog.txt— Resetting the Stage (сброс)
Теперь , когда мы их объединили (они вошли в «дом», в «семью»).
Вы можете разгрузить файлы, используя команду git reset. Идем дальше и удаляем octofamily / octodog.txt.
Ничего не произойдет на экране.
git checkout — octocat.txt— Отменить
Команда git reset отлично справилась с проблемой остановки файла octodog.txt, но вы заметите, что он все еще там. Он просто больше не устраивает. Было бы здорово, если бы мы могли вернуться к тому, как все было до того, как появился октодог и разрушил вечеринку.
Файлы можно изменить до того, как они были в последнем коммите, используя команду: git checkout — . Идем дальше и избавляемся от всех изменений с момента последнего фиксации для octocat.txt
Изменений не видно.
git branch clean_up— Разветвление
Когда разработчики работают над функцией или ошибкой, они часто создают копию (ака. branch) своего кода, с которой могут делать отдельные коммиты. Затем, когда все будет готово, они могут объединить эту ветку с основной master ветвью.
Мы хотим удалить все эти надоедливые октокаты, поэтому давайте создадим ветвь под названием clean_up, где мы сделаем всю работу:
Видимых изменений нет.
git checkout clean_up— Переключение ветвей
Теперь, если вы наберете git-ветвь, вы увидите две локальные ветки: основную ветвь с именем master и новую ветвь с именем clean_up.
Вы можете переключаться между ветвями, используя команду git checkout
. Попробуйте теперь переключиться на ветку clean_up:
git rm ‘*.txt’— Удаление всех вещей
Итак, вы в ветке clean_up. Вы можете, наконец, удалить все эти надоедливые октокаты, используя команду git rm, которая не только удалит фактические файлы с диска, но и подготовит удаление файлов для нас.
Вы снова захотите использовать подстановочный знак, чтобы получить все осциллографы за один раз, запустить и запустить:
git commit -m «Remove all the cats»— Внесение изменений в ветвь
Теперь, когда вы удалили всех «кошек», вам нужно будет зафиксировать изменения.
Не стесняйтесь запускать git-status, чтобы проверить изменения, которые вы собираетесь совершить.
git checkout master— Переключение на главную
Отлично, вы почти закончили работу с «кошкой» . исправили ошибку, вам просто нужно вернуться к главной ( master)ветке, чтобы вы могли скопировать (или merge — объединить) ваши изменения с ветки clean_up обратно в ветвь master.
Идем дальше и проверяем основную master ветку:
git merge clean_up— Подготовка к слиянию
Уже, наступил момент, когда вам нужно объединить ваши изменения из ветки clean_up в ветвь master. Сделайте глубокий вдох, это не так страшно.
Мы уже на главной master ветке, поэтому нам просто нужно сказать Git объединить ветку clean_up в нее:
git branch -d clean_up— Ведение чистоты
Вы только что выполнили первое успешное исправление ошибок и слияние. Остается только убирать за собой. Поскольку вы закончили с веткой clean_up, она вам больше не нужна.
Вы можете использовать git branch -d для удаления ветки. Теперь удалите ветку clean_up:
git push— Последний толчок
Вот и мы, на последнем шагу. Я горжусь, что вы сделали это так далеко, и было здорово узнать Git с вами. Теперь вам остается только нажать на все, над чем вы работали в удаленном репозитории, и все готово!
Потренироваться можно здесь! Этот Git Tutorial и был для вас опубликован на русском языке. Почти на русском 🙂
Источник